

Blog
Rockin’ Wood Paneling Review: Right for Our Shop?

Ever start an accent-wall build thinking it’ll be a fast weekend upgrade—then hit the usual snags: bowed boards, inconsistent thickness, and a tight workspace where every cut has to be clean and intentional? When we’re trying to add character without turning the shop (or living room) into a full milling operation, precision, ease of installation, and predictable material quality start to matter as much as the final look.
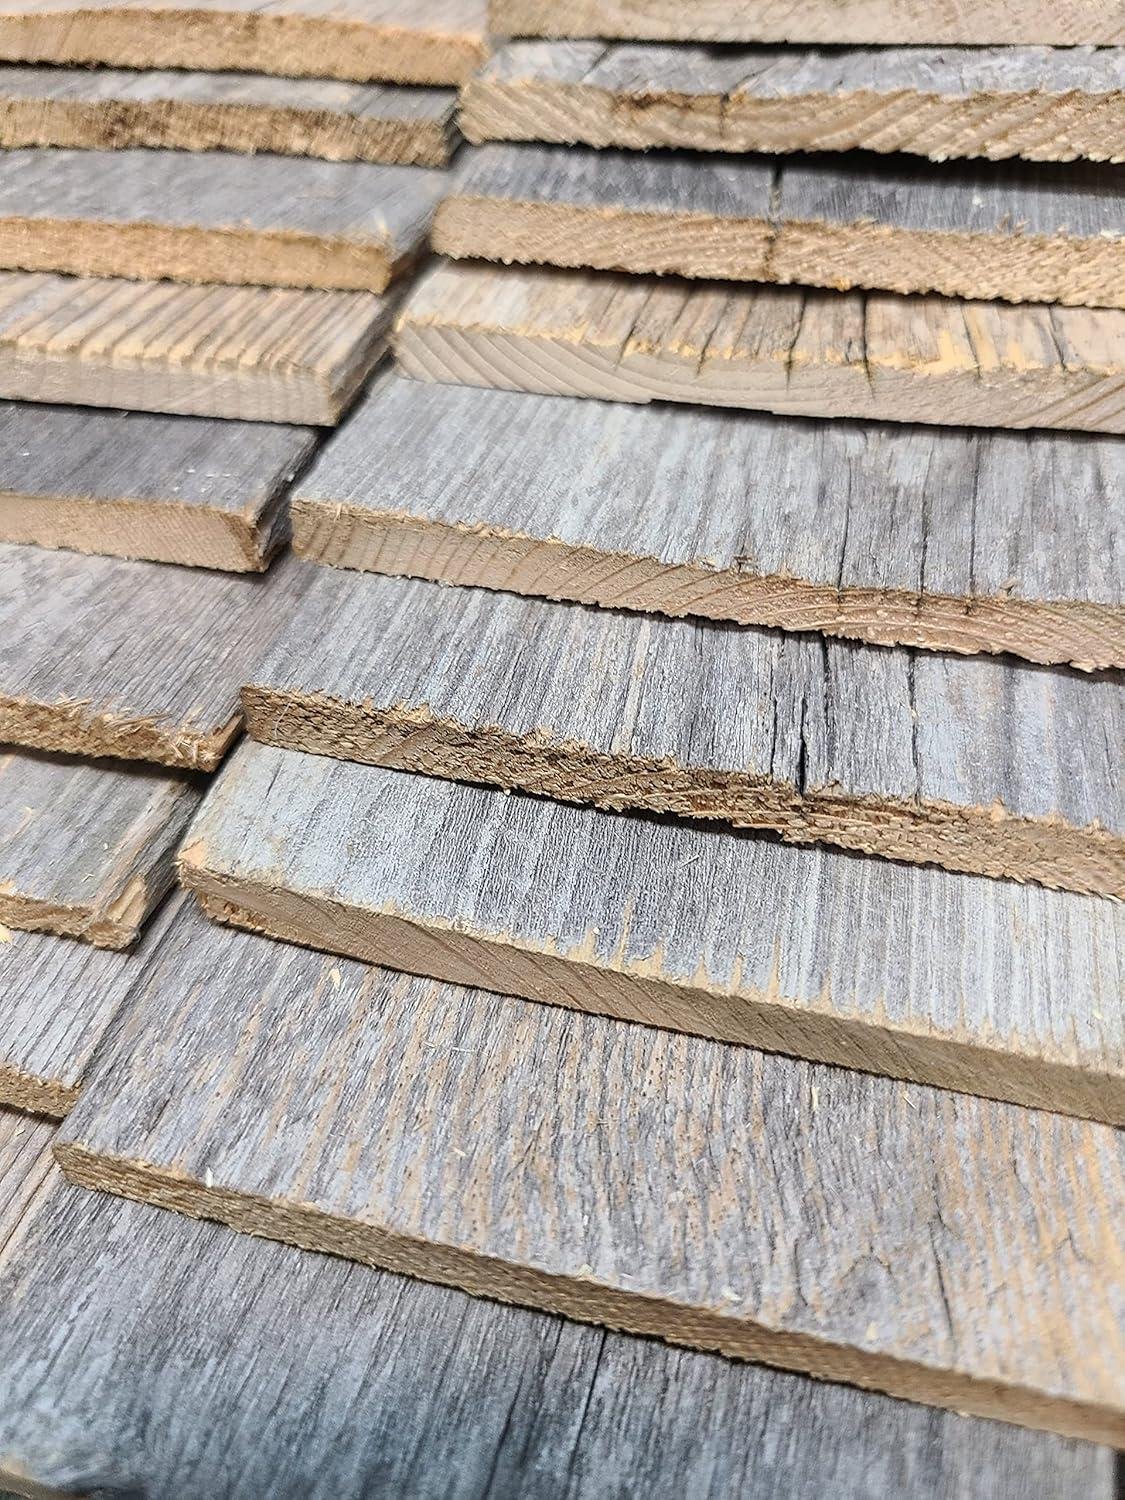
rockin’ Wood Real Wood Nail Up Submission is a box of rustic reclaimed barn-wood planks designed for wall paneling—104 square feet of naturally weathered boards that are roughly 1/4-inch thick and about 3.5 inches wide, with varying lengths for that authentic reclaimed layout.
In this review,we’ll dig into what the specs mean in real projects: how workable the planks are with common tools,what the mixed feedback on thickness and straightness suggests,and whether nail-up vs. adhesive makes sense. We’ll also weigh budget vs.finish quality and who this product best fits—DIYers, small-shop woodworkers, or anyone chasing a true reclaimed aesthetic.
We’ve built enough shop fixtures, trim, and wall installs to know: the material can make or break the job before the first nail is fired.
First Impressions and Finish Quality of the Reclaimed Barn Wood Planks
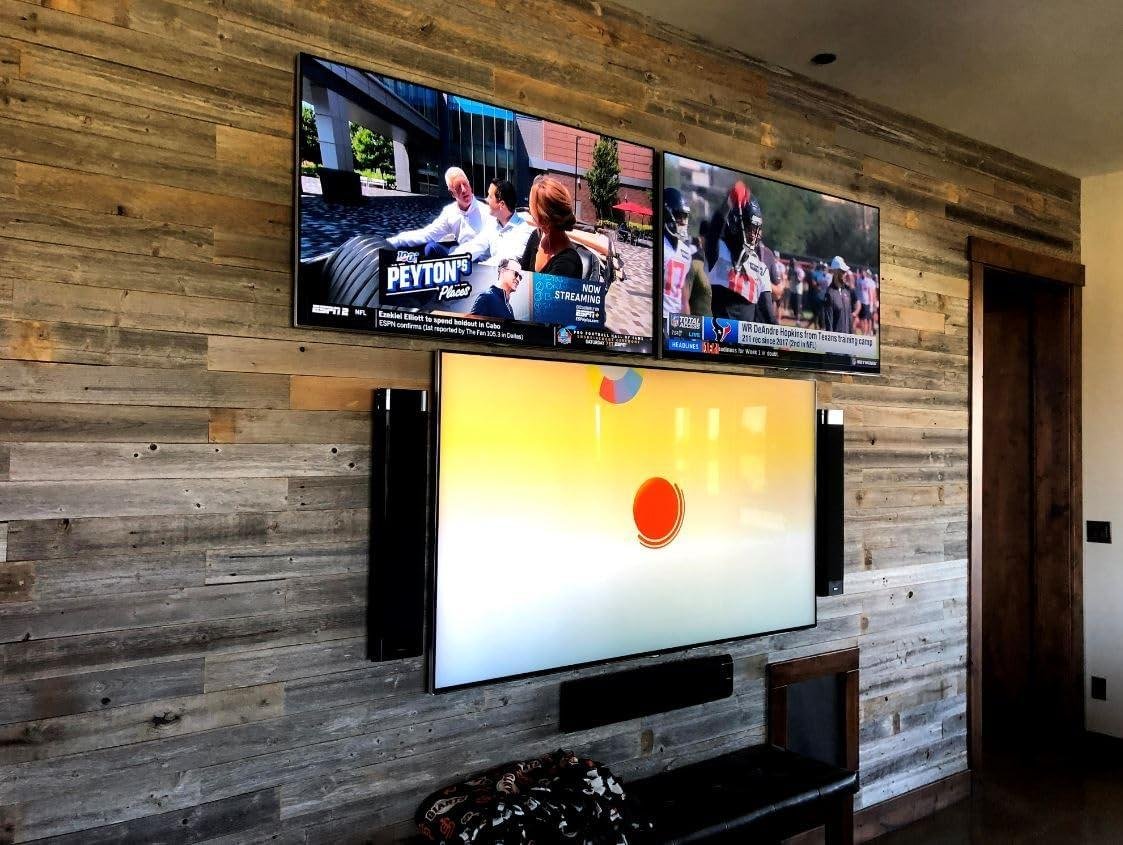
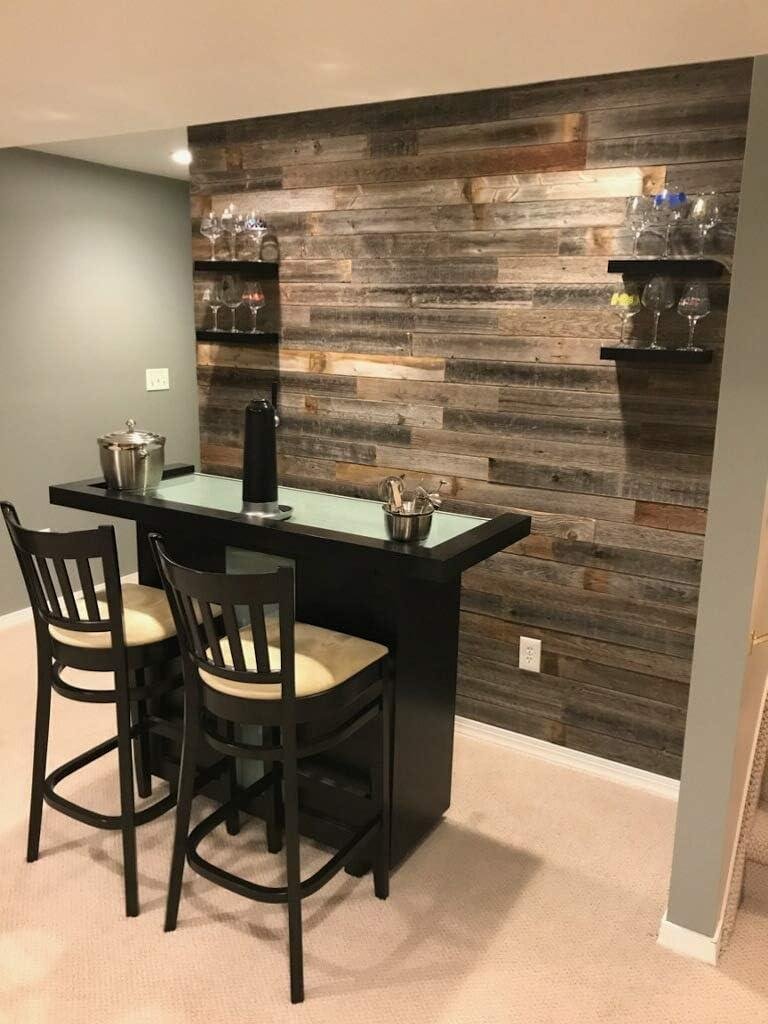
When we first opened up the Rockin’ wood box, the immediate takeaway was that this is real reclaimed barn wood, not a printed veneer pretending to be rustic. The planks are spec’d at approximately 1/4-inch thick and 3.50 inches wide, with lengths that vary by box, and that “every board is different” vibe shows up right away in the grain, weathering, and the generally gray, naturally aged palette. That aligns with what customers repeatedly praise as the “beautiful appearance,” “great gray color,” and “lots of character,” especially for accent walls. From a shop workflow standpoint, these are the kind of boards we’d dry-lay on the bench first and sort by tone/texture before we ever touch a nailer—multiple reviewers specifically recommend laying out boards before installation and keeping joints staggered, and we agree that pre-planning is what makes the randomness look intentional instead of chaotic.
On finish quality,we can tell Rockin’ Wood is targeting wall cladding practicality more than furniture-grade perfection: customer feedback commonly notes the boards are “already milled,” “planed,” and “pretty square,” but also reminds us that this is reclaimed material,so knot holes,old nail holes,slight cup,and minor bowing are part of the package.A nice detail mentioned in reviews is the maker’s use of black felt/fabric/paper backing behind certain knots/holes, which helps keep the wall from visually “leaking through” the voids.The one workshop caution we’d call out is the thickness debate—reviews are mixed, with some calling it “the right thickness” and others saying it’s “very thin” and even “delicate…like balsa wood,” which tracks with reports of fraying edges on cuts. Practically, that means we’d treat it like thin panel stock: use a sharp fine-tooth blade (or a backer board when cutting), and consider nail-up over heavy adhesive if your substrate or glue choice could introduce moisture and warp (one reviewer explicitly warns, “do not use adhesive” after pieces warped overnight). For clean-looking terminations, several customers learned the hard way that edge trim can hide cut ends, which is a smart move on any reclaimed install where end grain and tear-out can steal attention from the face patina.
Real World Performance on Interior Accent walls and shop Projects
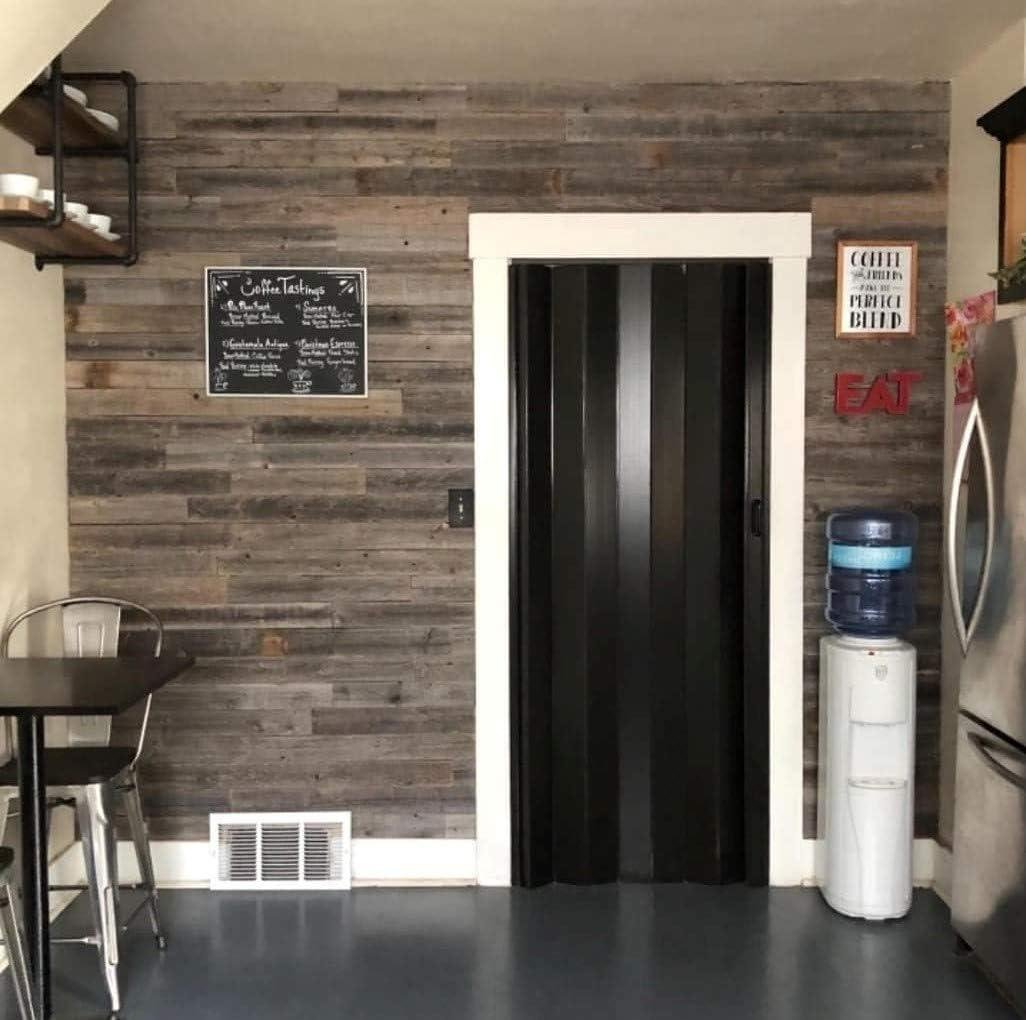
On real-world interior accent walls, Rockin’ Wood’s reclaimed planks behave less like “paneling” and more like thin, character-grade stock—so our workflow matters. The box is sold as 104 square feet of coverage, and each plank is roughly 1/4-inch thick by 3.50 inches wide with varying lengths, which matches what customers describe as “slender profile” boards that go up fast but need layout planning. Reviewers repeatedly praise the look—“beautiful reclaimed barn wood,” “great gray color,” and lots of “character”—and they’re right to point out that the charm comes with natural variability: knot holes, old nail holes, and occasional cups/warps.in practice, we’d treat this like a finish material: dry-fit and stage the wall first, then install. Multiple customers recommend (and we agree with) laying out boards before installation, using a level, and keeping joints staggered—because the widths/lengths aren’t guaranteed uniform and “minor gaps” can show if we rush. Several reviewers report smooth installs over existing surfaces (like outdated paneling) using a pneumatic brad nailer, while others note that the boards are “thin” or even “delicate,” so we’d avoid overdriving fasteners and would pre-plan outside corners and termination points where cut edges will be visible.
For shop projects—photo backdrops, bar fronts, columns, quick rustic cladding, and set builds—these planks can be a convenient way to get real reclaimed texture without milling our own, but we need to cut and handle them like lightweight material. Customers mention cutting with a miter saw, jigsaw, and Skilsaw, and one theme we take seriously is that clean cuts can be tricky: one reviewer said it’s “extremely hard to make clean cuts without fraying edges,” and recommended edge trim to hide cut edges.In our shop mindset, that means: use a sharp, fine-tooth blade (or a new finish blade), support the workpiece to prevent tear-out, and consider painter’s tape on the cut line when appearance matters. Adhesives are also worth caution—while the product description says it installs with construction adhesive or trim nails, at least one reviewer warned “do not use adhesive” after experiencing warping on a brick chimney, so if we must glue (especially over masonry), we’d test a small area first and prefer mechanical fastening when possible. We also appreciate the detail some buyers noticed: knot holes backed with black felt/paper to prevent see-through; that’s helpful for accent walls and for shop backdrops where light leaks can ruin the look.
- Included accessories: none (planks only)
- Compatible attachments/accessories: pneumatic brad/finish nailer, trim-head nails, construction adhesive (test first), miter saw/jigsaw/circular saw with fine-tooth blade, edge trim/corner molding, level/laser level, spacer blocks
- Ideal project types: interior accent walls, photo/video backdrops, bar fronts, columns/wraps, entryway features, shop set walls, staged display panels
- Wood types tested by customers: Reclaimed barn wood (naturally weathered, varied tone/texture, knot holes and nail holes expected)
| Spec / Trait | what it Means in the Shop | What Customers Commonly Report |
|---|---|---|
| Coverage: 104 sq ft (this listing) | Plan for layout time; order with waste in mind due to odd lengths/cutoffs | “Waste was minimal” for some; others had “a lot of scrap pieces” from fitting around studs |
| Thickness: ~1/4″ | Lightweight and easy to nail; can be delicate—avoid aggressive clamping/cutting | Mixed: “right thickness” vs “thin/delicate” |
| Width: ~3.50″ | Fast coverage; stagger seams; expect natural variation | variation in width/texture called out as part of the rustic look |
| Color: naturally weathered gray variation | Dry-lay to balance tones; consider dark wall paint behind for gaps | Strong praise for “great gray color” and “color variation” |
| Accessory | Recommended Use | Why It Helps |
|---|---|---|
| 18ga brad nailer | Most interior wall installs | Multiple reviewers installed successfully with brads; reduces mess vs adhesive |
| Finish nailer + small brads | When you need a slightly stronger bite | Reported holding well even with minor cupping/warp |
| Fine-tooth saw blade | Visible cuts and trim ends | Helps reduce “fraying edges” mentioned in reviews |
| Edge trim / corner molding | Outside corners, wall terminations | Hides end-grain and imperfect cuts; directly recommended by a reviewer |
| Category | Recommended (Best Practice) | Real-World Notes from Reviews |
|---|---|---|
| Waste factor | Plan 10–15% extra for cuts/odd lengths | Some installs were efficient; others reported lots of scrap due to fitting and “odd” lengths |
| Fastening method | Trim/brad nails for most situations | One reviewer experienced warping after using construction adhesive on brick |
see Full Specifications & Customer Photos
Key Features Woodworkers Will Appreciate in Grain Character and Board Consistency

For grain character, these Rockin’ Wood planks deliver what most of us actually want from reclaimed material: honest variation that looks intentional once it’s on the wall. The box is rated for 104 sq ft coverage, and the boards are listed at roughly 1/4-inch thick and 3.50 inches wide, with lengths that vary by box—so we’re not building fine cabinetry hear, we’re composing a surface. That natural mix is exactly what customers keep praising as “beautiful appearance and character,” with repeated callouts for a “great gray color” and “color variation” that helps hide seams and makes an accent wall feel organic rather of patterned. A practical workshop tip: because the face is already weathered,we get more control by doing a dry layout on the floor first (a theme that pops up in reviews—“recommend laying out boards before installation”),then grouping boards by tone and knot density so we can “steer” the wall’s look without sanding away the patina that makes it reclaimed in the first place.
On board consistency, the key feature woodworkers will appreciate is that these are marketed as already milled/planed boards intended for a nail-up application, meaning the install is more like careful trim carpentry than rough planking. Several reviewers note they’re “milled well and pretty square” and “planed to the same thickness with very minimal bowing,” but there’s also consistent feedback that they can be thin, sometimes “not uniform,” and occasionally “slightly warped and cupped.” That tells us to treat these like light stock: use a sharp fine-tooth blade,support the backer to prevent tear-out,and expect some edge fuzzing—one customer even said it’s “extremely hard to make clean cuts without fraying edges.” In the shop, we’d keep a block plane or sanding block handy strictly for easing cut ends (not flattening faces), and we’d strongly consider fastening with trim nails/brads rather than heavy adhesive if we want reversibility—especially as one reviewer warns “Do not use adhesive” after reporting warping overnight. For best results, we’d snap level lines, locate studs, and keep joints staggered (another common success theme), because even good reclaimed boards will telegraph mistakes if we skip layout discipline.
See full Specifications & Customer Photos
Ease of Installation for Beginners and Fit and Layout Control for Experienced Woodworkers
For beginners, the big win with Rockin’ Wood is that it behaves less like a “milling project” and more like a straightforward wall-covering job: the planks come pre-milled, and the install method is clearly aimed at DIY success—trim nails or construction adhesive per the listing. In the shop, that means we can keep the tool list short: a small miter saw, jigsaw, or circular saw for fit cuts, plus a pneumatic brad nailer/finish nailer and a level. Customer reviews consistently echo that it’s “very easy to work with and install,” with multiple people noting they “used a brad nailer” and that the wall “went up fast,” even over outdated paneling. Where we’d coach first-timers is in prep: as each plank is approximately 1/4-inch thick and about 3.50 inches wide with lengths that vary, we should dry-lay boards before installation (a repeated reviewer tip) and start with a dead-straight reference line so the rustic variation doesn’t snowball into visible drift. We also want to set expectations—reviewers stress “THIS IS RECLAIMED BARNWOOD”, so knot holes, old nail holes, and minor gaps are part of the look, not defects.
For experienced woodworkers, the same variability is exactly where we gain layout control. The product’s naturally weathered color variation and mixed widths/lengths let us “compose” the wall like a panel glue-up: we can distribute darker boards, cluster grain, and intentionally stagger seams (another common review theme: “kept the joints staggered”).As the boards are relatively thin (~1/4-inch), we can also fine-tune reveal lines with back-bevels or edge dressing—but we should cut gently: one reviewer called the material “very delicate… extremely hard to make clean cuts without fraying edges,” which is a clue to use a sharp fine-tooth blade and support the fibers (painter’s tape on the cut line helps). Adhesive is where pros will want to be selective: while the listing says adhesive is acceptable, at least one reviewer warns “Do not use adhesive” after experiencing warp—so on critical installs (brick chimney, heat-adjacent, or humidity swings), we’re better off with nail-up or test a small bonded area first. We’d also plan edge strategy (trim, returns, or picture-frame border), as odd lengths and the rustic profile can leave cut ends that look raw—one reviewer specifically said they’d use edge trim next time to hide cuts.
See Full specifications & Customer Photos
Customer Reviews analysis

What Woodworkers Are Saying (Rockin’ Wood Real Wood Nail-Up Rustic Reclaimed Barn Wood Planks, 104 sq ft)
1. Overall sentiment from woodworking customers
woodworking-minded reviewers trend positive about the look and authenticity—especially those specifically shopping for real reclaimed barn wood character rather than uniform, furniture-grade boards. Common praise includes the color variation,grain character,and “rustic on purpose” imperfections (knot holes,nail holes). Sentiment turns negative when buyers expect consistent milling or when installation choices (notably glue/adhesive) lead to warping.
2. performance feedback (accuracy, power, results)
Because this is wall paneling (not a tool), “performance” feedback centers on workability and finished results:
- Cutting/trim results: Several woodworkers mentioned the planks can be delicate and prone to fraying on cut edges, making “clean” trim cuts harder than expected. One reviewer noted it felt “very delicate… much like Balsa wood” and said clean cuts were challenging without edge damage.
- fit-up and layout: Multiple reviews highlight that widths and lengths vary,so accuracy depends on the installer’s layout and patience—measure each board,keep courses level,and expect some waste.
- End results: Customers successfully used this for accent walls and reported being “very pleased” with the final look, especially when joints were staggered and the wall was started level.
3. Build quality and durability observations
Reviewers generally agree the boards are authentic reclaimed wood, which comes with variability:
- Milling/thickness consistency: Several woodworkers mentioned boards were planed to a fairly consistent thickness, though others reported not identical thickness. Some noted they were “for the most part… milled well and pretty square,” but still required a level during install.
- Warp/cup/bow: Some users reported slight cupping/warping, which a few considered acceptable (even desirable for character). Others found warping problematic—especially in combination with adhesive (see limitations).
- Knot holes/nail holes backing: Multiple reviews highlight knot holes and voids, sometimes covered from the back with black paper/fabric pieces. Some appreciated this detail for aesthetics; at least one reviewer disliked it.
- Breakage/shipping: Some users reported challenges with broken boards on arrival, though they also mentioned responsive customer service.
4.Ease of use for different skill levels
- DIY/beginner-amiable basics: Several woodworkers mentioned installation is approachable with basic tools (miter saw or jigsaw) and straightforward fastening (brad/finish nailer).
- Skill/experience helps with layout: Reviewers with DIY experience found success by taking time, measuring each board, and starting level. One DIYer described it as “go slow but steady” and indicated the process took about a week of incremental work.
- More advanced finishing expectations: Some users reported challenges when trying to achieve clean, furniture-like edges, suggesting that users who care about crisp trim lines may want added steps (edge trim, pre-sorting boards, test cuts).
5. Common project types and success stories
Customers successfully used this for:
- Accent walls over existing surfaces: One reviewer installed it over outdated paneling using a pneumatic brad nailer and staggered joints, reporting a very satisfying result.
- Chimney and stove surrounds / rec room features: Several reviewers mentioned installing behind a wood-burning stove area and behind a bar in a rec room.
- Entryway + feature wall combos: One DIYer reported completing one accent wall plus an entryway wall, praising the color/grain variation.
6. issues or limitations reported
Some users reported challenges with:
- Adhesive-related warping: One reviewer installed over brick using construction adhesive and said pieces warped overnight, creating major rework and cleanup. this is one of the strongest negative callouts—multiple installers prefer nail-up to keep boards stable and removable.
- Delicate edges and “fray” when cutting: Clean cut edges can be tough; one reviewer recommended using edge trim to hide cut ends if doing it again.
- Inconsistent sizing / odd lengths = waste: Several woodworkers mentioned odd lengths and variable widths,leading to more scrap and extra measuring/sorting time.
- Quality/value complaints from a minority: A small number of reviews were bluntly negative (including a french review implying very poor quality / very small pieces), suggesting occasional mismatch between expectations and what arrives.
Quick Theme Summary
| Aspect | Common Feedback |
|---|---|
| Performance / Results | Praised for standout rustic look and color variation; cutting can fray and requires planning to minimize visible edges. |
| Precision / Consistency | Widths and lengths vary; thickness is often close but not always identical—level lines and board-by-board measuring are important. |
| Durability / Stability | some cupping/warping reported; adhesive install over certain surfaces triggered notable warping for at least one user. |
| Ease of Use | Generally DIY-friendly with a brad/finish nailer; best results come from slow layout, staggered joints, and optional trim. |
| Value | Strong value for buyers who want real reclaimed character; disappointing for those expecting uniform, defect-free boards. |
Pros & Cons
pros & Cons: Rockin’ Wood Paneling in a Real-World Shop Build
when we picture reclaimed barn wood on a wall, we picture character—the kind that makes a shop feel intentional rather of improvised.
Based on the product details and what reviewers consistently report, here’s what we see as the main wins and trade-offs with Rockin’ Wood’s
104 sq ft box.
| What we cared about | What this product seems to deliver | Potential “gotcha” |
|---|---|---|
| Rustic, authentic look | True reclaimed vibe with weathered gray tones and real texture | Imperfections (knot holes, nail holes, gaps) are part of the deal |
| fast install | Reviewers frequently enough describe it as easy and quick with basic tools | Length/width variations mean more layout time upfront |
| shop-friendly durability | Real wood planks, lightweight, workable | Thin planks can feel delicate and fray on cuts if we rush |
| Predictable finish | Generally praised color variation and “accent wall” payoff | Boxes can vary; some boards may arrive lighter/different than expected |
Pros
- Genuinely rustic “reclaimed barn wood” character. we’re not buying faux print—reviewers repeatedly say it looks beautiful, adds warmth, and brings a lived-in texture that plain walls don’t have.
- Natural weathered gray color with visual variety. The mixed tones and grain patterns tend to read as intentional and high-impact, especially for an accent wall in a workspace or retail-style shop area.
- DIY-friendly to cut and nail up. Many users mention a smooth install with a brad/finish nailer and common saws (miter saw,jigsaw),with projects moving quickly once the first row is level.
- “Small-batch” feel and customer service stories. Some reviews mention responsive support and problem-solving when color expectations didn’t match the box—good news if our shop timeline is tight.
-
Lightweight material that suits accent walls. At roughly 1/4-inch thick, it’s less bulky than heavier cladding—handy when we’re trying not to overbuild on an existing wall surface.
Cons
- Thickness is a mixed bag. that ~1/4-inch profile is perfect for some accent-wall installs,but others find it too thin or “delicate,” especially if we expect a chunkier plank look.
- Expect variations in width, length, and straightness. rustic charm can also mean slight warp/cup and odd lengths—so we’ll likely want to dry-lay boards first and plan for extra measuring and trimming.
- Cut edges can fray if we’re not careful. A few reviewers mention getting clean cuts can be tricky.In our shop, that could mean we’ll want sharper blades, slower cuts, and possibly trim to hide edges.
- Adhesive installs can be risky in certain situations. While it’s marketed as nail-or-glue, at least one reviewer reported warping after using construction adhesive on a masonry surface. For our use, we may prefer nails (or test adhesive on a small area first).
- Not a “perfectly uniform” wall finish. minor gaps and patched knot holes (some mention dark backing material) may show up. If our goal is clean, modern, and seamless, this aesthetic could fight us instead of helping.
our takeaway: If we want our shop to feel warmer and more story-driven—without taking on the chaos of sourcing and milling random reclaimed boards—this looks like a strong fit. If we want uniform planks, thick boards, and pristine cuts, we’ll want to look elsewhere (or budget time for trim, extra layout, and careful cutting).
Q&A
What “wood type” is this and how consistent are the boards?
These are real reclaimed barn wood planks (naturally weathered), not a printed veneer or laminate. Expect natural variation board-to-board: color shifts (frequently enough gray), knot holes, old nail holes, and occasional checks—including some pieces that aren’t perfectly straight. reviews frequently call out the “character” as the main appeal, and several mention that widths/lengths vary by box, so dry-laying your layout first is the best way to control the final look.
Is it thick enough for a durable wall install, and will it hide wall imperfections?
The listed thickness is approximately 1/4″ (with planks about 3.5″ wide), which is on the thinner side for wall paneling. That thin profile is a plus for easy cutting and for keeping weight down, but it won’t “flatten” a wavy wall the way thicker tongue-and-groove might. Customer feedback on thickness is mixed: some love it as “perfect for wall application,” while others consider it “thin” or “delicate,” so plan on starting with the straightest wall surface you can and use a level as you go.
What tools cut this cleanly—can I use a miter saw, jigsaw, or table saw?
Most DIY and woodworker setups will cut these just fine—reviewers specifically mention using a miter saw, jigsaw, and even a Skil saw. Because it’s reclaimed and fairly thin, clean edges can be tricky: one reviewer noted fraying/tearout and recommended hiding cut ends with edge trim. Practical tip: use a fine-tooth blade, support the piece close to the cut, and consider a quick backer board or painter’s tape at the cut line to reduce splintering.
Nail-up or adhesive—what actually works best?
Specs say you can install with construction adhesive or trim nails, but real-world experiences lean strongly toward nails/brads for predictable results. Multiple reviewers had success with a pneumatic brad/finish nailer and liked that it can be removed later without destroying the wall. At least one customer reported significant warping after using construction adhesive (especially over a brick chimney),so if you plan to glue,test a small area first and consider combining light spot-glue with brads rather than heavy adhesive coverage.
Will this work in a small shop or on-site install—do I need a lot of equipment?
It’s well-suited to small-shop or “install where it lands” workflows because the planks are lightweight and thin, and many people report fast installs with basic tools. You don’t need a jointer/planer to get started—the product is already milled/planed for wall application (though you should still check level and pick your best faces).A compact miter saw or jigsaw plus a brad nailer (or trim nails) is the common approach in reviews.
Beginner-friendly, or does it take pro-level skills to make it look good?
Beginner-friendly with one caveat: layout matters more than “fine woodworking” technique. Reviews repeatedly mention that the boards go up quickly, but that you should start level, stagger joints, and measure each piece because lengths and widths can vary. If you’re comfortable with basic cutting and keeping a consistent reference line, you’ll do fine; a pro will likely just move faster and be more selective about board placement for color/texture balance.
How much waste should I plan for, and is it suitable for production work?
Plan for some waste. Because lengths are mixed and some boards may be cupped/warped or require trimming around outlets/edges, one reviewer mentioned having “a lot of scrap pieces” on a stud-based wall layout. For one-off accent walls and small projects, it’s a great fit; for production jobs where you need uniform length, perfect straightness, and minimal culls, reclaimed material can slow you down. Dry-lay and sort into “feature boards” vs. “cut boards” to keep waste under control.
What should I do about gaps, knot holes, and the black backing some boards have?
Minor gaps and knot holes are part of the reclaimed look, and several reviews note that small gaps may be visible up close without hurting the overall effect. Some boxes include black material on the back side of knot holes (taped/fabric/paper) to prevent see-through to the wall—customers often appreciate it, but if you dislike it you’ll want to plan whether to keep/remove it before install. A common pro tip from reviewers: paint the wall a dark gray/black first so any small gaps blend in rather than flashing shining drywall.
Discover the Power
Rockin’ Wood Real Wood Nail Up Application Barn Wood planks are a finishing material kit, not a powered tool—sold here in a large 104 sq. ft. box of real reclaimed boards roughly 1/4″ thick and about 3.5″ wide, with varied lengths and naturally weathered gray/brown color. Reviews consistently praise the authentic look,character,and how quickly it goes up with basic shop staples (brad/finish nailer,miter saw/jigsaw),while noting common reclaimed-wood realities: knots,holes (frequently enough backed),color variation,and occasionally thin,delicate,or slightly cupped pieces.
Best for hobby woodworkers and DIYers tackling accent walls, entryways, columns, bars, and “feature” backdrops where rustic variation is the goal.
Consider alternatives if you need uniform thickness, dead-straight boards, perfectly clean edges, or plan to rely heavily on construction adhesive (some users reported warping).
Final assessment: a solid option for fast, authentic reclaimed-wall results—just plan your layout, expect imperfections, and nail for best control.
Want to see current pricing and customer photos? View on Amazon & Read More Reviews →


