

Blog
10 Rustic Wood Projects You Can Make Today (You’ll Be Amazed at #5!)
If you’ve been itching to bring a bit of rustic charm into your home, then you’re in for a treat! The simple beauty of rustic wood projects has a way of transforming ordinary spaces into warm and inviting havens. I created this post because I know how satisfying it can be to craft something unique, especially when it adds character to your living space. Plus, there’s nothing quite like the feel of natural wood under your hands as you shape it into something beautiful.
This post is perfect for DIY enthusiasts and anyone looking to enhance their home decor without breaking the bank. Whether you’re a seasoned craftsman or just starting, these projects offer something for everyone. You’ll discover practical tips and inspiring ideas that can make your home cozier and more stylish. Plus, trust me—you’ll be absolutely amazed at the stunning wood coffee table project that ranks fifth on our list!
Let’s dive in and explore ten delightful rustic wood projects you can make today, each one designed to help you unleash your creativity while adding a touch of handmade warmth to your home.
Key Takeaways
– Versatile Projects: Each of the ten projects caters to various skill levels, ensuring you can find something that suits your abilities and interests.
– Materials Matter: Using reclaimed or new wood can change the vibe of your project. Explore different wood types for unique results.
– Home Decor Impact: Rustic wood elements can elevate your living space, making it feel more inviting and personal.
– Step-by-Step Guidance: The included instructions will help you navigate each project with ease, ensuring your crafting experience is enjoyable and fulfilling.
– Budget-Friendly Ideas: These projects are not just fun; they also offer affordable ways to enhance your home decor while honing your DIY skills.
1. Rustic Floating Shelves
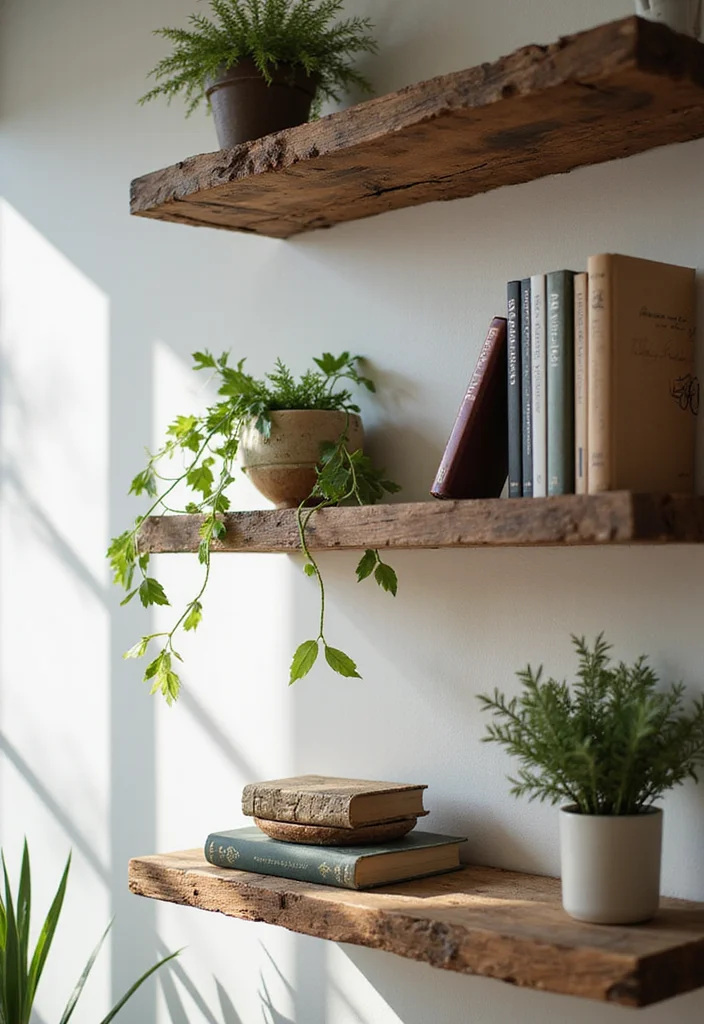
Are you looking to combine style and functionality in your space? Rustic floating shelves offer a stunning way to showcase your favorite decor while maximizing wall space. With a bit of reclaimed wood, you can create shelves that not only display items beautifully but also add character to your home with their unique weathered finish.
Begin by measuring the wall area you want to use. Cut the wood to the appropriate lengths, then sand it down until smooth. Adding a wood stain enhances the rustic look, and reliable brackets will ensure your shelves are sturdy and safe.
Key steps to get started:
– Choose reclaimed wood for genuine rustic charm.
– Select a stain that complements your home’s color scheme.
– Ensure brackets are securely mounted for strength.
With these shelves, you’ll enjoy a stylish way to display cherished items and save space. They can transform any room into a cozy haven.
2. Charming Wooden Planter Box
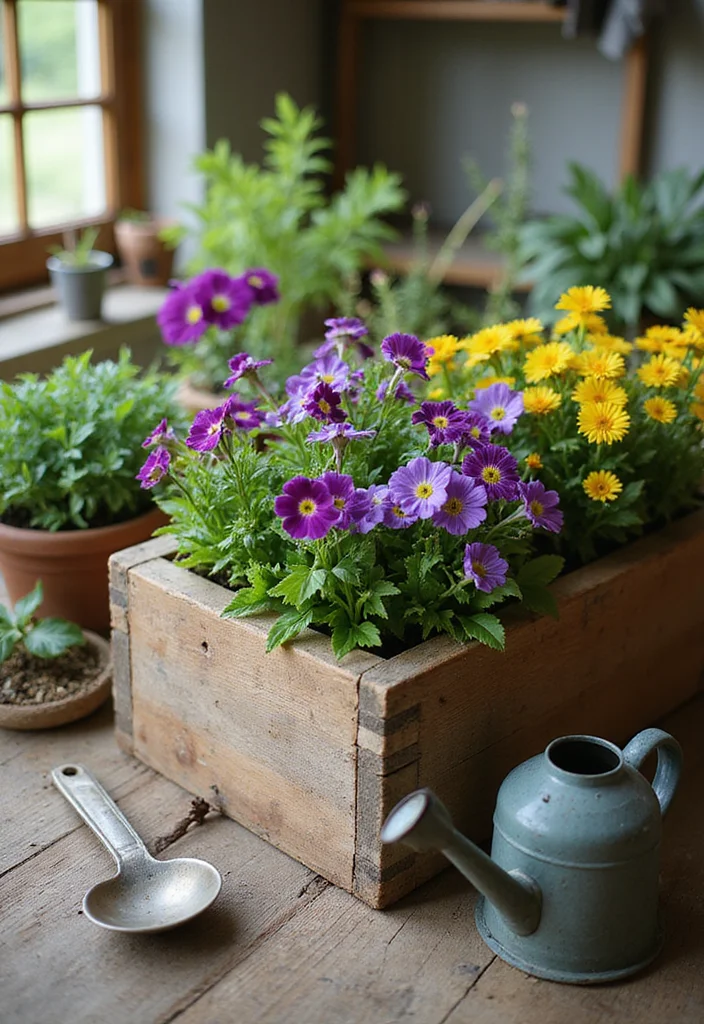
Want to bring some greenery into your home effortlessly? A charming wooden planter box is the perfect project to add a touch of nature while enhancing your decor. Using untreated wood, you can create a beautiful box to house your favorite plants and herbs, making it an attractive focal point in any room.
Start by cutting your wood boards to the desired lengths for the sides and base. Assemble the box with screws for stability, then give it a rustic finish with a wood stain. Don’t forget to fill it with soil and your chosen plants for an inviting natural display.
Key materials needed:
– Untreated wood boards for construction.
– Wood screws for assembly.
– Stain or paint for the finishing touch.
This planter box not only enhances your space with greenery but also allows for a rewarding gardening experience right at home.
3. Cozy Wooden Bench
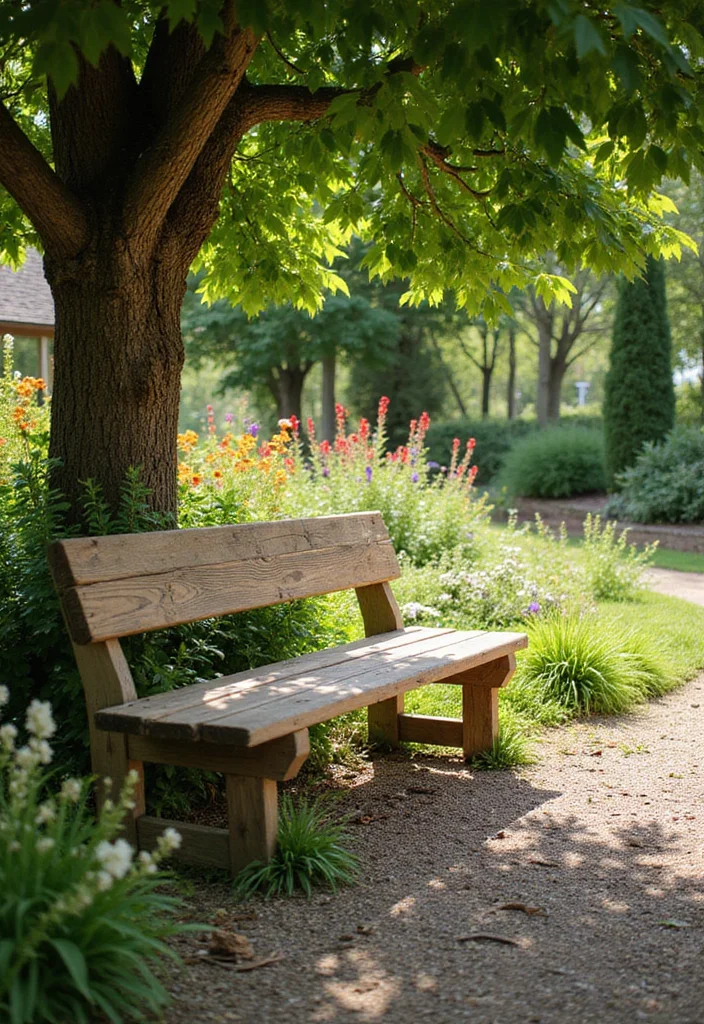
Imagine a cozy wooden bench gracing your backyard or entryway. This project is straightforward and highly customizable, making it a wonderful addition to your outdoor or indoor space. With some lumber, you can craft a sturdy bench that perfectly fits your style and needs.
Begin by cutting wood pieces for the bench top and legs. Use screws to securely assemble them, ensuring stability for seating. A coat of stain or paint can add a personal touch, completing your cozy bench for relaxation or gatherings.
Materials you’ll need:
– Lumber for both the top and legs.
– Wood screws for assembly.
– Stain or paint to finish.
By creating this bench, you’ll have a beautiful spot to unwind, making your space more inviting and functional.
4. DIY Rustic Picture Frame
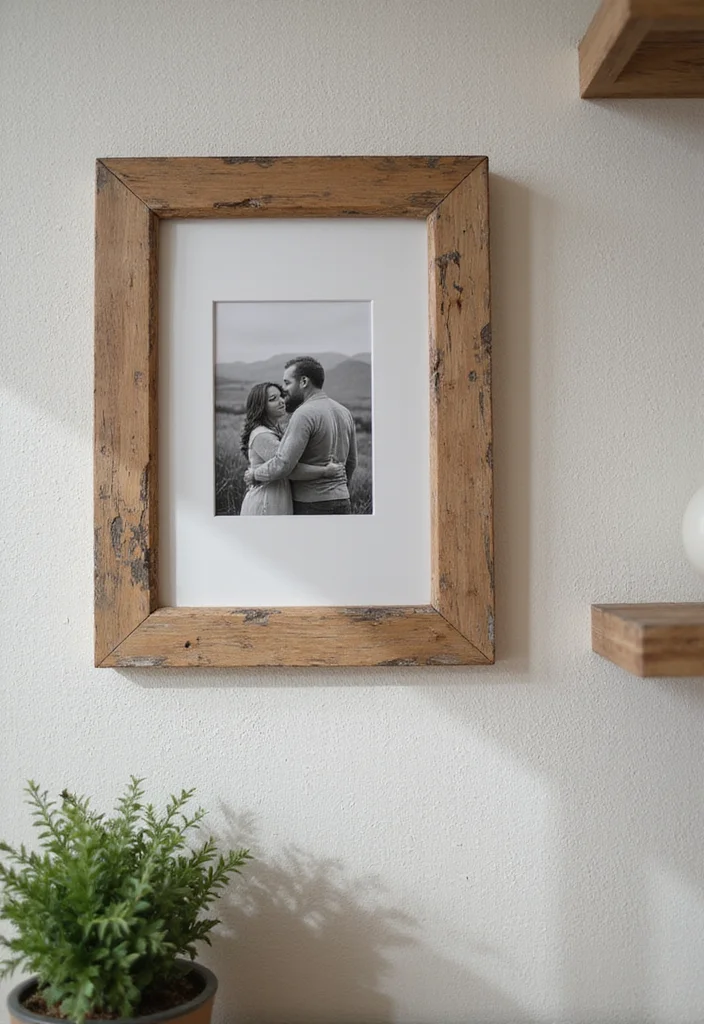
Capture and showcase your memories in a beautifully crafted rustic picture frame. This project not only highlights your favorite photos but also adds a unique charm to your walls. With just a few pieces of wood, you can create a frame that reflects your style and the warmth of your memories.
Start by cutting wood into pieces that fit around your photo. You can distress the wood for a vintage look or keep it smooth for a classic finish. Assemble the frame using glue and nails, and consider adding a hanging mechanism for easy display.
Key materials to gather:
– Untreated wood pieces for the frame.
– Wood glue for assembly.
– Nails or screws for durability.
This DIY frame is a heartfelt way to showcase your cherished moments, bringing a personal touch to your decor.
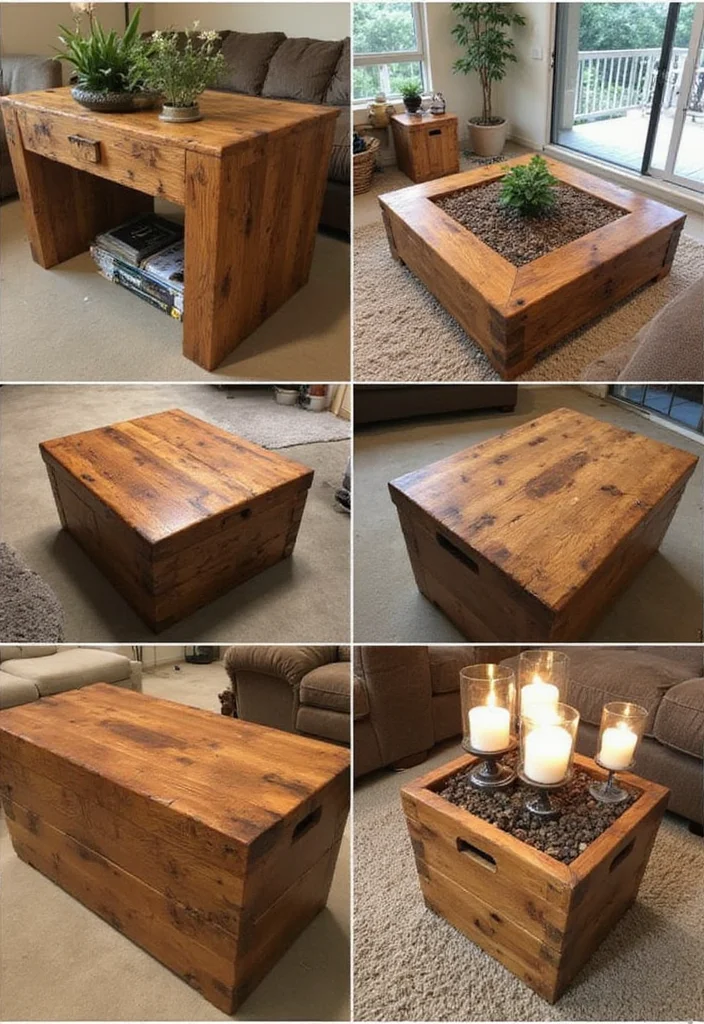
5. Stunning Wood Coffee Table
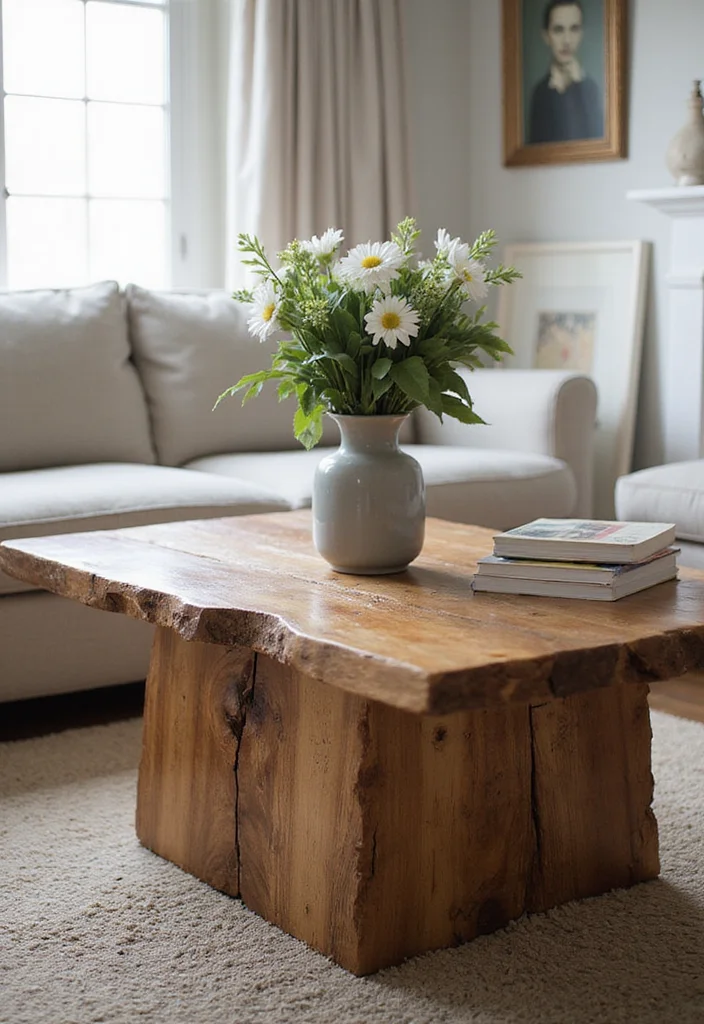
Looking for a standout piece for your living room? Crafting a stunning wood coffee table is a rewarding project that enhances both style and functionality in your home. By selecting high-quality wood beams, you can create a table that serves as a beautiful centerpiece for your gatherings.
Begin by choosing the dimensions that best fit your space, then cut the wood accordingly. Use sturdy joints to assemble the base and tabletop, and finish with a wood stain to highlight the natural grain. You can even add shelves for extra storage and decoration.
Materials you will need:
– Quality wood beams for the structure.
– Wood screws or joints for assembly.
– Wood stain for a polished finish.
This coffee table not only elevates your living space but also provides a functional piece that reflects your personal style.
6. Rustic Wall Art
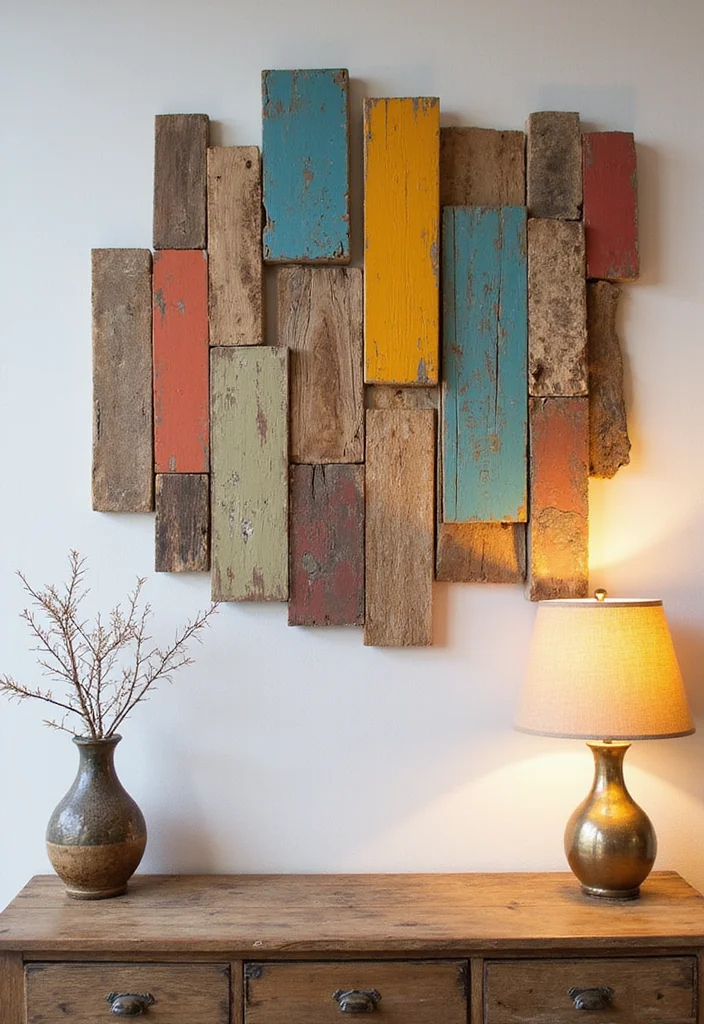
Unleash your creativity with stunning rustic wall art! This project allows you to personalize your decor while showcasing your artistic flair. With reclaimed wood boards, you can craft unique pieces that enhance your living space and tell a story.
Cut the wood into various shapes or sizes that inspire you. You can choose to paint them with quotes or leave them natural for a minimalist vibe. Arrange your creations in a gallery style for a captivating display.
Essential materials include:
– Reclaimed wood boards for authenticity.
– Paint or stain for decoration.
– Hanging hardware for easy display.
Creating this wall art not only beautifies your home but also reflects your personality and creativity.
7. Rustic Wood Coasters
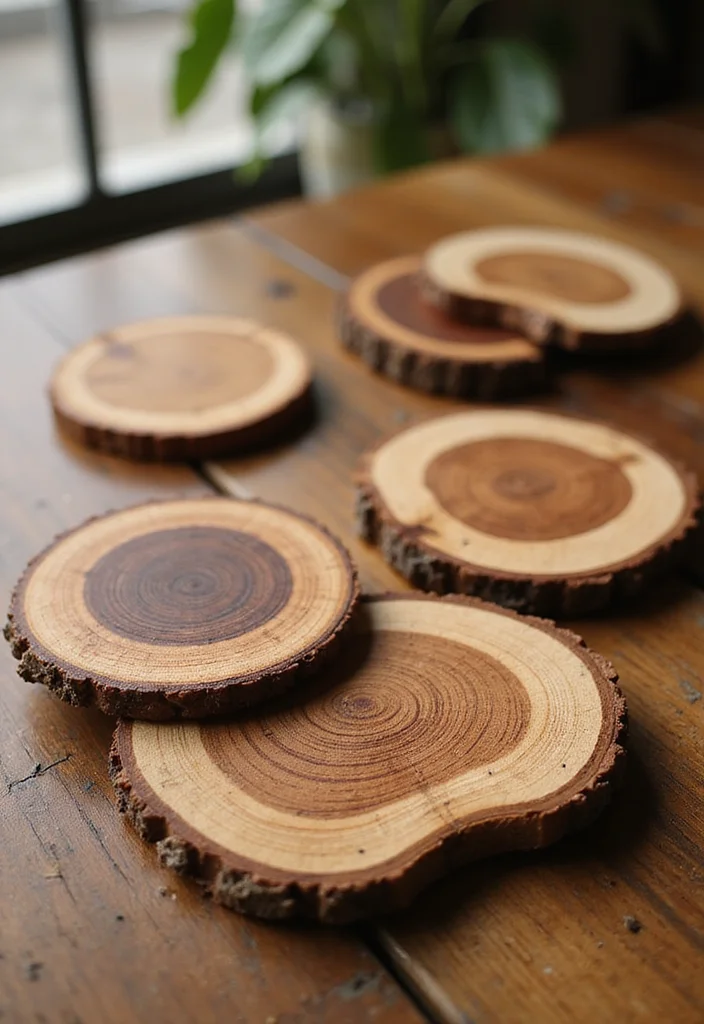
Protect your surfaces in style with handmade rustic wood coasters! This fun and functional project can be completed in just a few hours, making it perfect for any skill level. With a few simple materials, you can create coasters that add charm to your home.
Start by cutting logs or boards into thin rounds, then sand the edges until they’re smooth. Applying a wood sealant or stain will enhance their rustic appeal and protect them from moisture. These coasters not only serve a practical purpose but also make fantastic gifts.
Key materials to have:
– Logs or wooden boards for the base.
– Saw for cutting.
– Wood sealant for protection.
With these coasters, you’ll enjoy functional art that sparks conversation and keeps your surfaces safe.
8. DIY Wine Rack
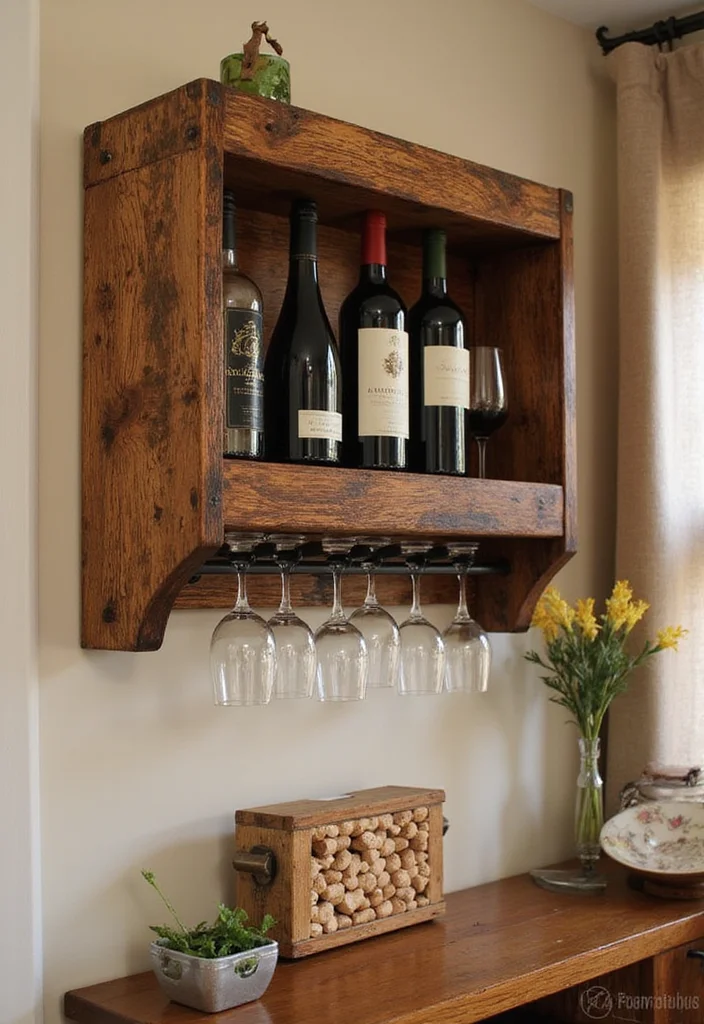
Wine enthusiasts, this DIY rustic wine rack is a fantastic addition to your home! Not only does it provide stylish organization for your wine collection, but it’s also a fun and rewarding project. With some wood planks, you can create a rack that displays your favorite bottles beautifully.
Cut the wood to the necessary dimensions to form the frame and slots for your bottles. Assemble the pieces, ensuring they’re stable and secure. Finish your rack with a stain that complements your decor for a polished touch.
Materials you will need:
– Wooden planks for construction.
– Wood screws for assembly.
– Wood stain for finishing.
This wine rack not only keeps your collection organized but also adds a touch of elegance to your space, making it a true conversation starter.
Difficulty Rating & Requirements
Overall Difficulty Rating: Medium
Creating rustic wood projects can be both rewarding and challenging. The level of difficulty varies based on the project type. While some projects are beginner-friendly, others may require moderate woodworking skills. If you have some basic experience with tools and wood, you’ll find these projects enjoyable and doable. If you’re a complete novice, consider starting with simpler projects like coasters or a planter box to build your confidence first.
Time Estimate:
⏱ Estimated time: 2 to 8 hours depending on the project. Here’s a breakdown:
– Rustic Floating Shelves: 2-3 hours
– Charming Wooden Planter Box: 1-2 hours
– Cozy Wooden Bench: 4-6 hours
– DIY Rustic Picture Frame: 1-2 hours
– Stunning Wood Coffee Table: 6-8 hours
Skill Requirements:
– Required skills: Basic woodworking, using hand and power tools, measuring and cutting wood.
– Beginner-friendly: Yes, for simpler projects like coasters and picture frames. These projects can help you learn basic skills before tackling more complex builds.
– Skills that can be learned include measuring, cutting, and assembling. More advanced techniques, like joinery or furniture finishing, may require some prior experience.
Tools & Materials Needed:
🧰 Essential items checklist:
– Measuring tape: Required
– Saw (hand saw or circular saw): Required
– Drill: Required
– Wood glue: Required
– Sandpaper: Required
– Wood screws: Required
– Paint or stain (optional): Optional
– Clamps (optional): Optional
Step-by-Step Overview:
1. Planning & Designing (1 hour): Start by sketching your project. Measure your space and gather materials. This phase sets the foundation for your work.
2. Cutting & Assembling (1-4 hours): Cut your wood pieces according to your design. Assemble them using glue and screws. This phase may take longer for complex projects like benches or tables.
3. Sanding & Finishing (1-2 hours): Sand the surfaces to smooth them out. Apply paint or stain if desired. This enhances the rustic look and protects the wood.
4. Final Assembly (1 hour): If your project consists of multiple pieces, this is where you put everything together. Ensure it’s sturdy and the joints are secure.
Professional vs DIY:
Rough cost comparison: Hiring a professional for a custom rustic wood project can range from $200 to $1,500 depending on the complexity and size. For instance, a custom coffee table might cost around $800 from a furniture store. In contrast, you can create your own stunning coffee table for about $150 to $300 in materials.
This DIY approach not only saves you money but also allows you to personalize your piece. If you’re skilled and confident in your abilities, tackling the project yourself could lead to a satisfying and budget-friendly result. If you feel unsure, don’t hesitate to seek help from a professional for more complex projects.
9. Rustic Garden Trellis
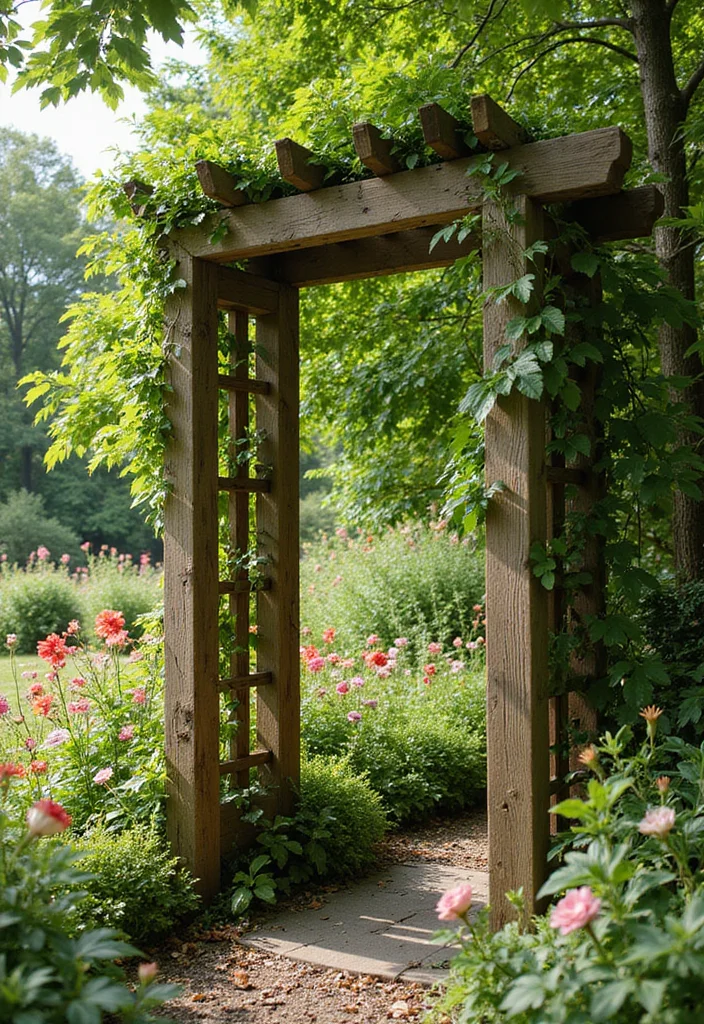
Elevate your garden’s charm with a rustic wooden trellis! This project serves a dual purpose: adding visual appeal while providing support for climbing plants. Building your own trellis is a great way to enhance your outdoor space with a personal touch.
Construct your trellis using wooden slats, cutting them to your preferred height and width. Assemble them in a lattice design, securing with strong joints. Don’t forget to protect your creation with a wood stain or preservative for durability against the elements.
Essential materials include:
– Wooden slats for structure.
– Wood screws for assembly.
– Wood stain or preservative for protection.
This rustic trellis not only supports your plants but also contributes to a stunning garden aesthetic, creating a welcoming atmosphere.
10. Rustic Candle Holders
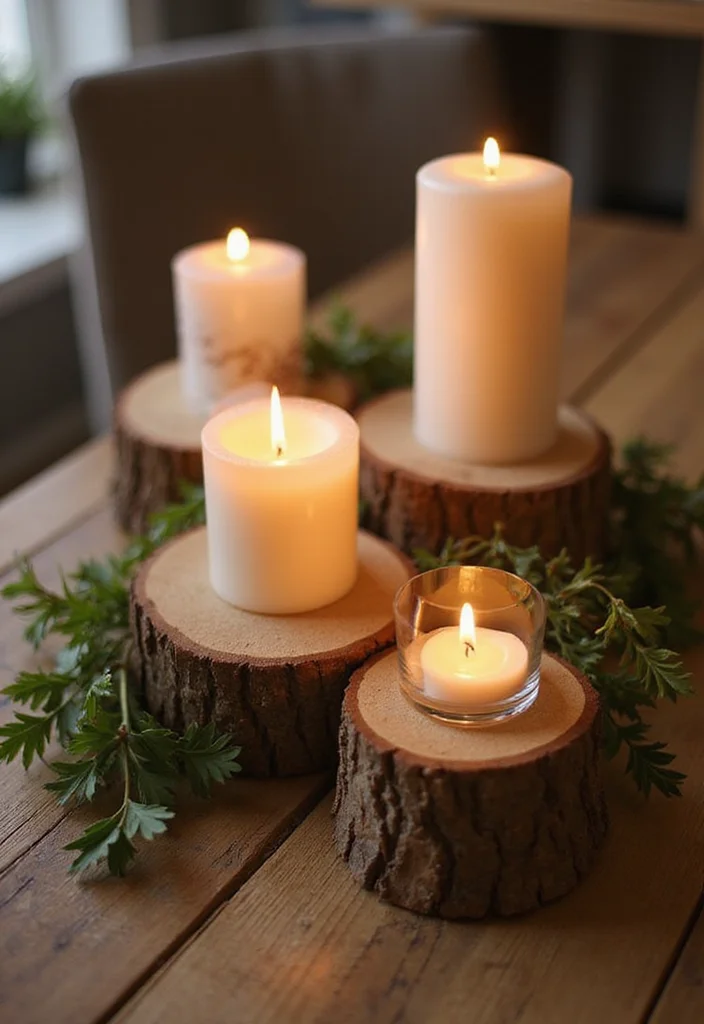
Create a warm, welcoming atmosphere in your home with DIY rustic candle holders. This quick project adds a cozy touch to any space and can be completed in just a few hours. With a few materials, you can craft candle holders that look great and enhance your home’s ambiance.
Start by cutting wood into blocks or rounds, then drill holes to fit your candles snugly. Sand the edges and use a natural finish to bring out the wood’s beauty. Place your candle holders around your home to enjoy the soft glow during evenings.
Materials needed:
– Wood blocks or rounds for the base.
– Drill for creating candle holes.
– Sandpaper for smoothing edges.
These candle holders not only illuminate your space but also add a personal and rustic charm that makes your home feel inviting.
Conclusion
These ten rustic wood projects are not just fun to make; they also add a unique charm to your home. Each project reflects creativity and personal touch, making your space feel warm and inviting.
Whether you choose to create a stunning coffee table or cozy candle holders, the satisfaction of crafting something with your own hands is unparalleled. Share your creations with friends and family, and let your rustic style shine!
Note: We aim to provide accurate product links, but some may occasionally expire or become unavailable. If this happens, please search directly on Amazon for the product or a suitable alternative.
This post contains Amazon affiliate links, meaning we may earn a small commission if you purchase through our links, at no extra cost to you.
Frequently Asked Questions
What are some beginner-friendly rustic wood projects you can start today?
Great question! For beginner-friendly rustic wood projects you can start today, try a simple floating shelf, a photo display, or a candle tray.
To get rolling: pick a small project from the list, gather basic tools (saw, sandpaper, wood glue, clamps), cut to size, sand smooth, and assemble.
Finish with a quick wipe-on stain or wax to bring out the grain.
These DIY projects are perfect for cozy home decor touches.
Which rustic wood project on the list is easiest to finish in a weekend?
If you’re aiming for a weekend win, start with a simple wall shelf or a set of coasters.
They require minimal cuts, simple assembly, and quick finishing.
Steps: cut to size, sand smooth, glue and clamp, then secure with a couple of finishing nails or brackets.
A single coat of finish or a light stain gives instant home decor impact and keeps your rustic wood projects manageable.
How can I customize rustic wood decor to fit my home style without breaking the bank?
Get creative with finishes, sizes, and hardware.
Choose pine or reclaimed boards for warmth, pick an oil or stain that matches your palette, and add affordable hardware for a custom touch.
Mix and match pieces from the article’s list to build a cohesive set of rustic wood projects that mirror your home decor style—without blowing your budget.
What tools and supplies do I need to tackle the top 5 rustic wood projects?
Keep it simple with the essentials: a saw (handsaw or miter saw), sanding block or orbital sander, tape measure, square, wood glue, clamps, nails or screws, drill, and a finish (oil, stain, or wax).
Grab drop cloths, painter’s tape, and safety gear too.
With these basics, you’ll be ready to tackle any of the rustic wood projects on your list as part of your DIY home decor journey.
How should I finish and protect rustic wood projects to ensure they last?
Finishing is key for longevity.
Sand smoothly, wipe away dust, then apply your chosen finish in thin coats.
Oils or waxes give a natural look, while a polyurethane or sealant offers extra durability.
Apply 2–3 coats, let each layer cure, and re-wax or re-oil as needed. Place pieces away from excess moisture and use felt pads to prevent scratches in your home decor.
Related Topics
rustic wood projects
DIY home decor
easy woodworking
beginner friendly
upcycled furniture
farmhouse style
quick crafts
outdoor projects
handmade gifts
budget friendly
woodworking techniques
seasonal decor


