

Blog
Button Maker Press Review: Right Tool for Our Shop?

Ever wrapped up a clean build—tight joinery, crisp edges—only to realize the “finish” is the little details: a shop logo badge for your apron, a set of labels for drawer fronts, or merch for a weekend craft fair? That’s where accuracy, repeatability, and bench space suddenly matter as much as your table saw.
the Button Maker Machine Multiple Sizes is a metal button press kit designed to turn printed designs into pins in three diameters (1″, 1.25″, and 2.25″), using included interchangeable models, plus two circle cutters, a cutting mat/board, and 300 button-part sets (100 per size). It’s aimed at DIY makers and small-batch production, promising a sturdy build for higher-frequency use and an easy, step-by-step workflow.
In this review, we’ll look at what the kit includes, how the multi-size setup affects workflow, what customers report about ease of use and consistency, and whether the durability claims make sense for a crowded shop and a realistic budget.
We’ve spent years around woodworking tools, and we judge add-on shop gear the same way: precision, build quality, learning curve, and value.
Tool Overview and Build Quality in a Woodshop Setting

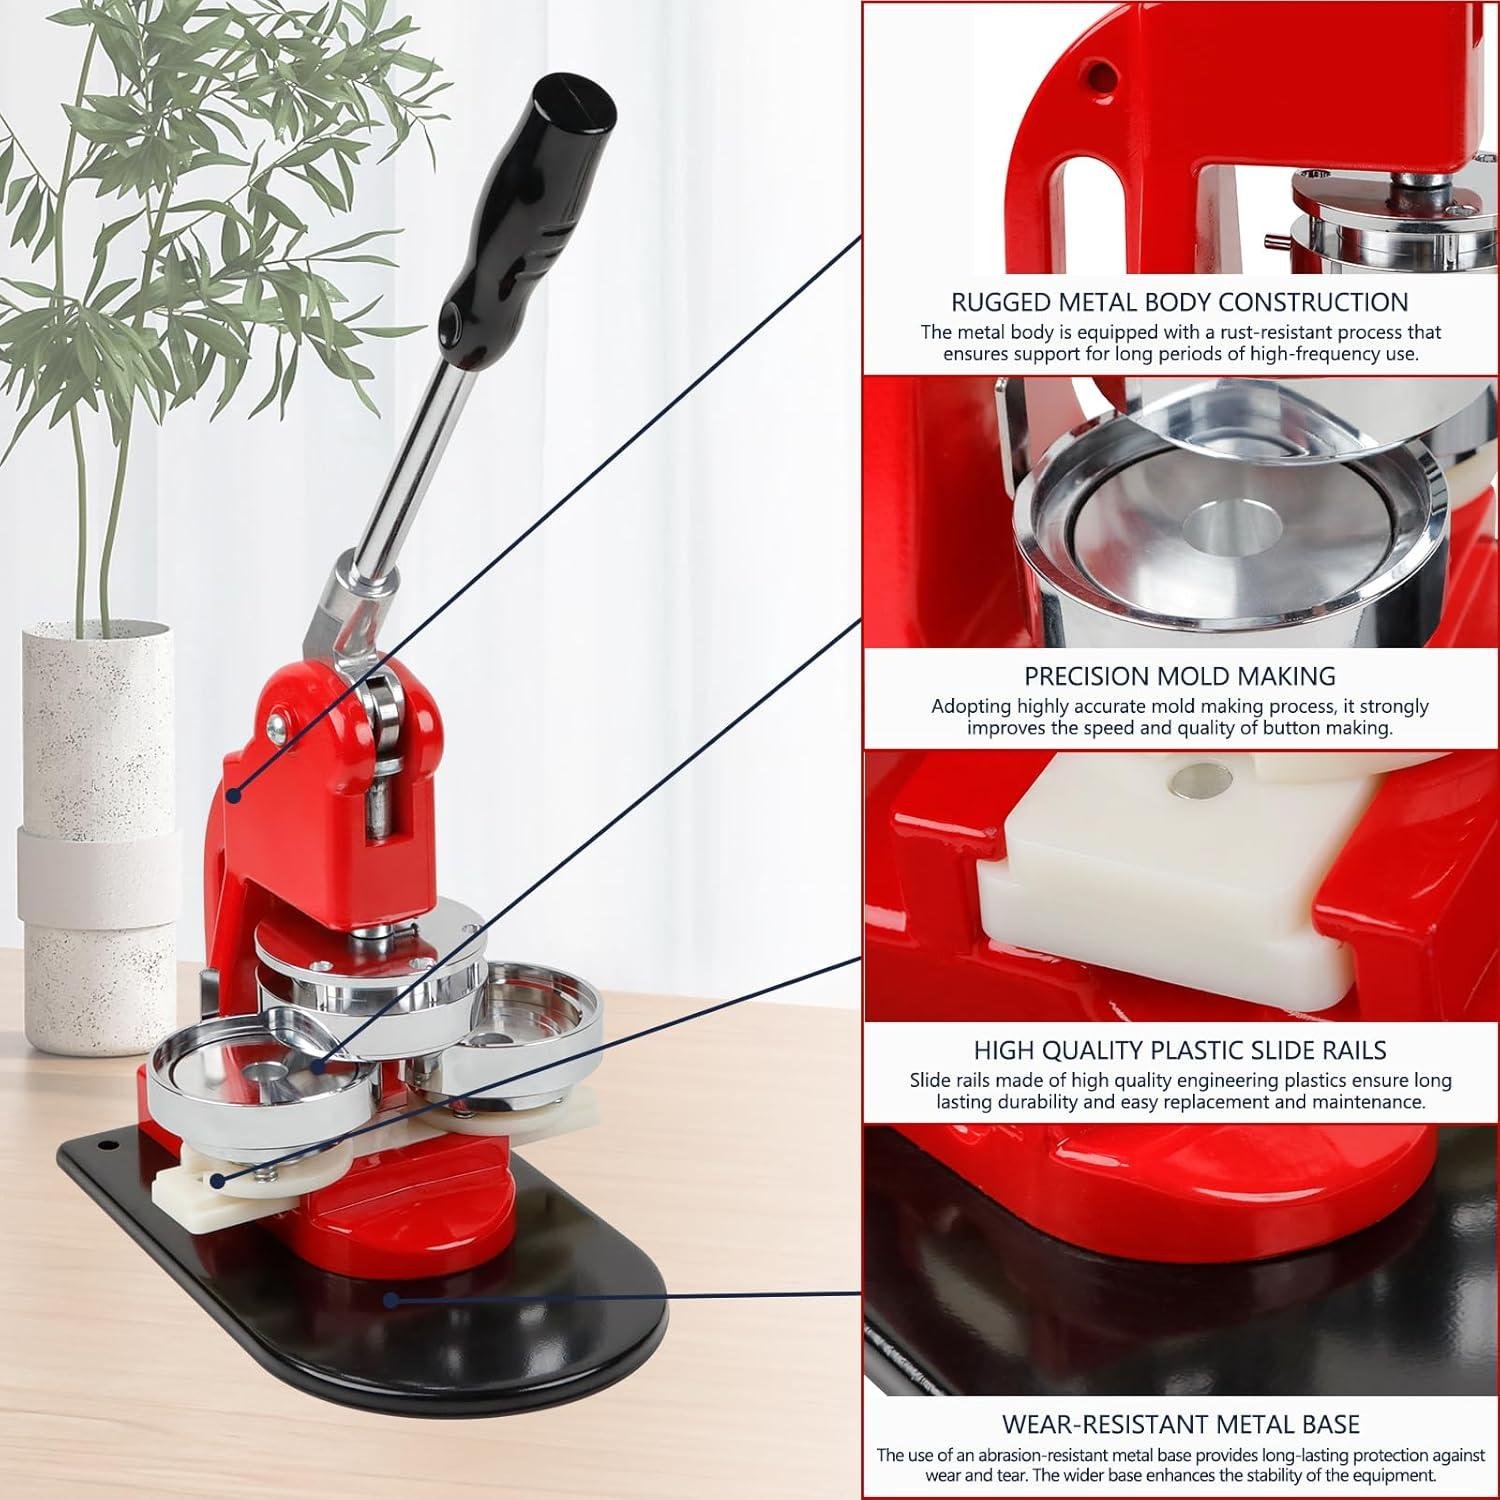
In a woodshop context, this kit reads less like a “power tool” and more like a small, benchtop press that we can keep near the finishing bench for shop branding and speedy shop-made labels. The core is a metal button press machine paired with three size dies: 1 inch (25mm), 1.25 inch (32mm), and 2.25 inch (58mm), so we can standardize everything from small maker’s marks to larger event badges without buying a second frame. There are no motor specs listed (no amps/HP/RPM), which is actually typical for a hand-lever press; rather, what matters in our shop is how solidly it sits and how consistently the linkage cams over at the bottom of the stroke. The product description leans heavily on “sturdy and durable” and “easy to follow instructions,” and customer feedback themes for presses in this class typically echo easy setup/assembly and a beginner-friendly learning curve—useful if we’re handing this off to apprentices or setting it up for open-shop days.
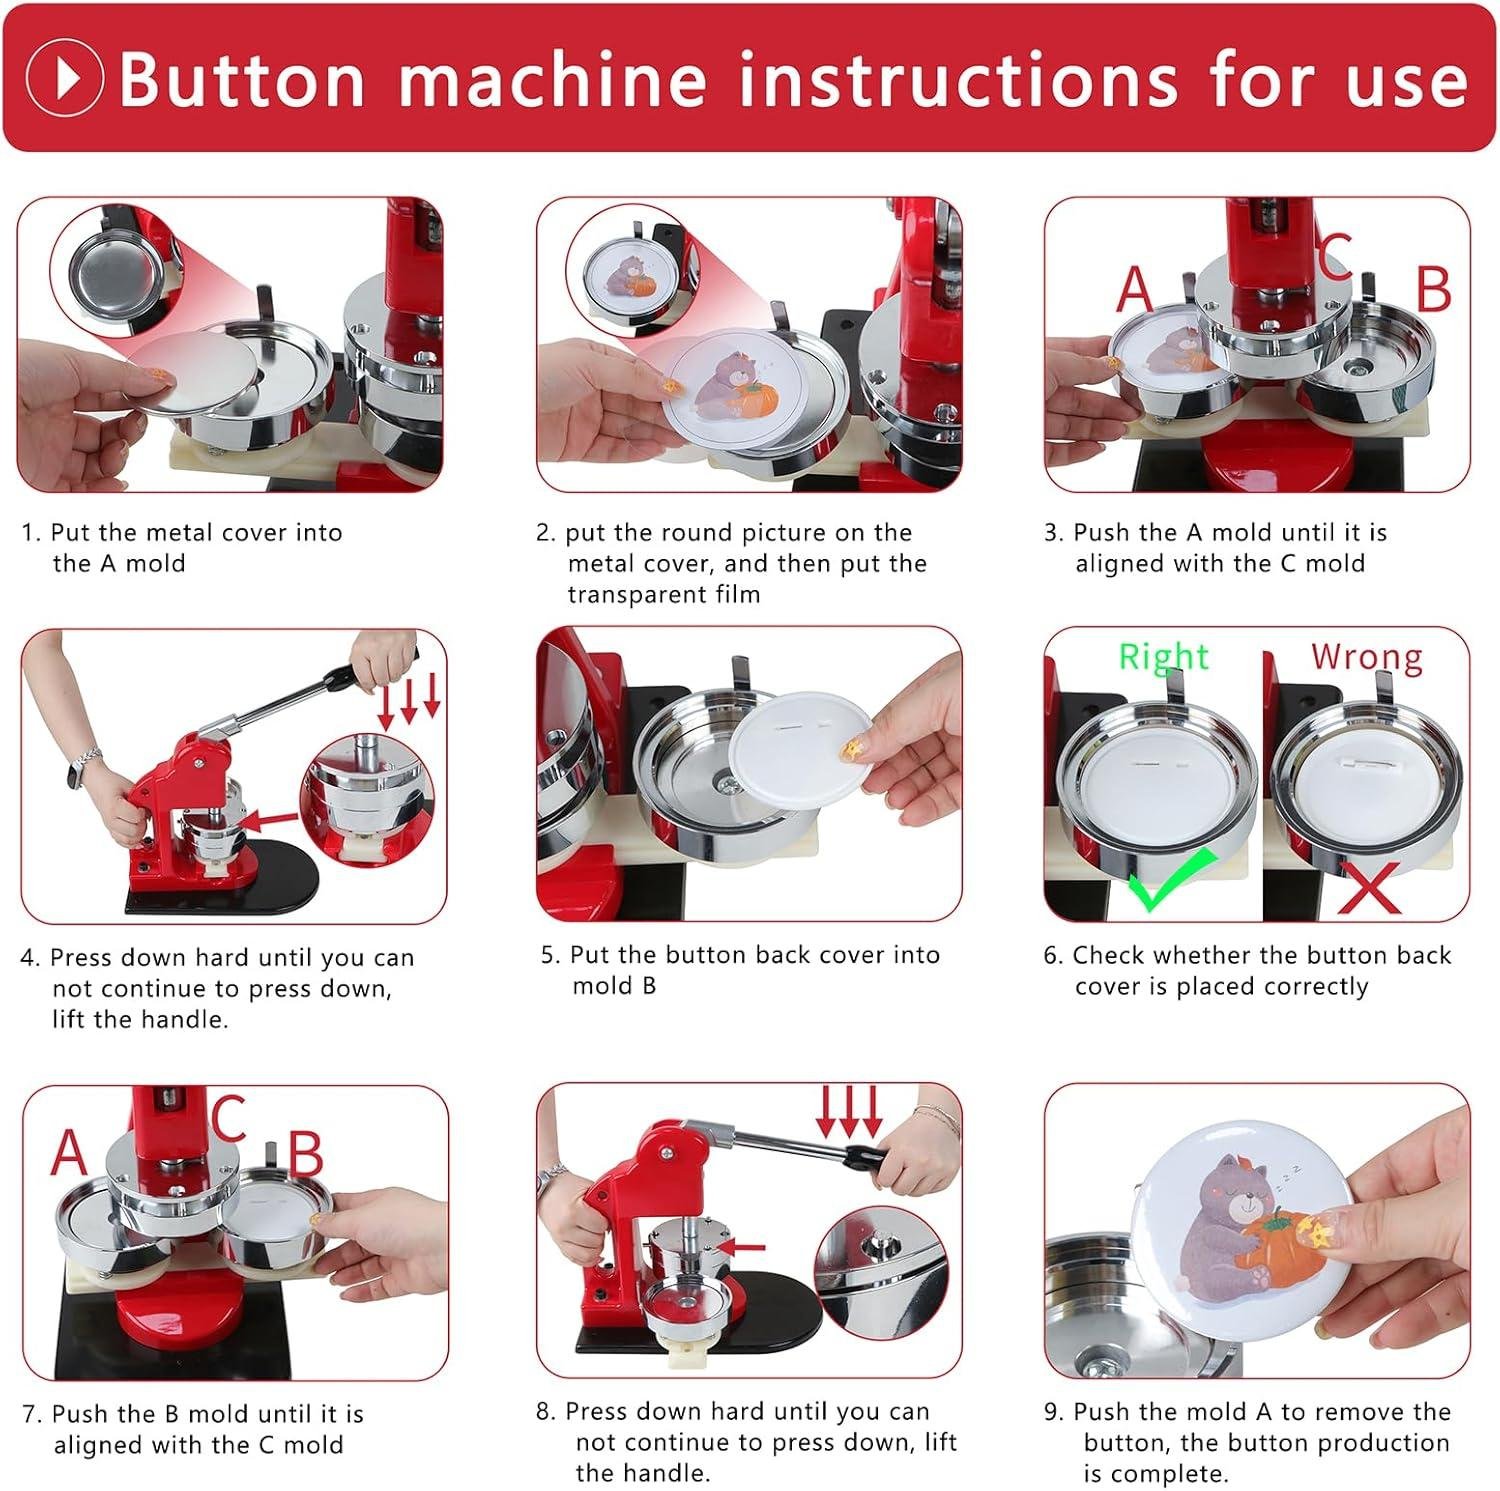
Build-quality-wise, we look at it the same way we’d judge a small arbor press: rigidity, die fit, and whether the bench setup keeps things from walking. The included cutting mat and round cutters should help us keep print circles consistent, but we’ll still want to treat it like any repetitive press operation—keep the work surface flat, keep fingers away from pinch points, and check die alignment before a long run. educationally, this tool works by stacking parts in a formed die and using leverage to crimp the shell around the graphic and backing; precision comes from cleanly cut circles and correct part order, not from “force.” In practical shop use, it’s best for club/shop logo buttons, customer thank-you pins, and toolbox/fixture identification tokens (especially when we’re trying to keep small groups organized during glue-ups or classes).
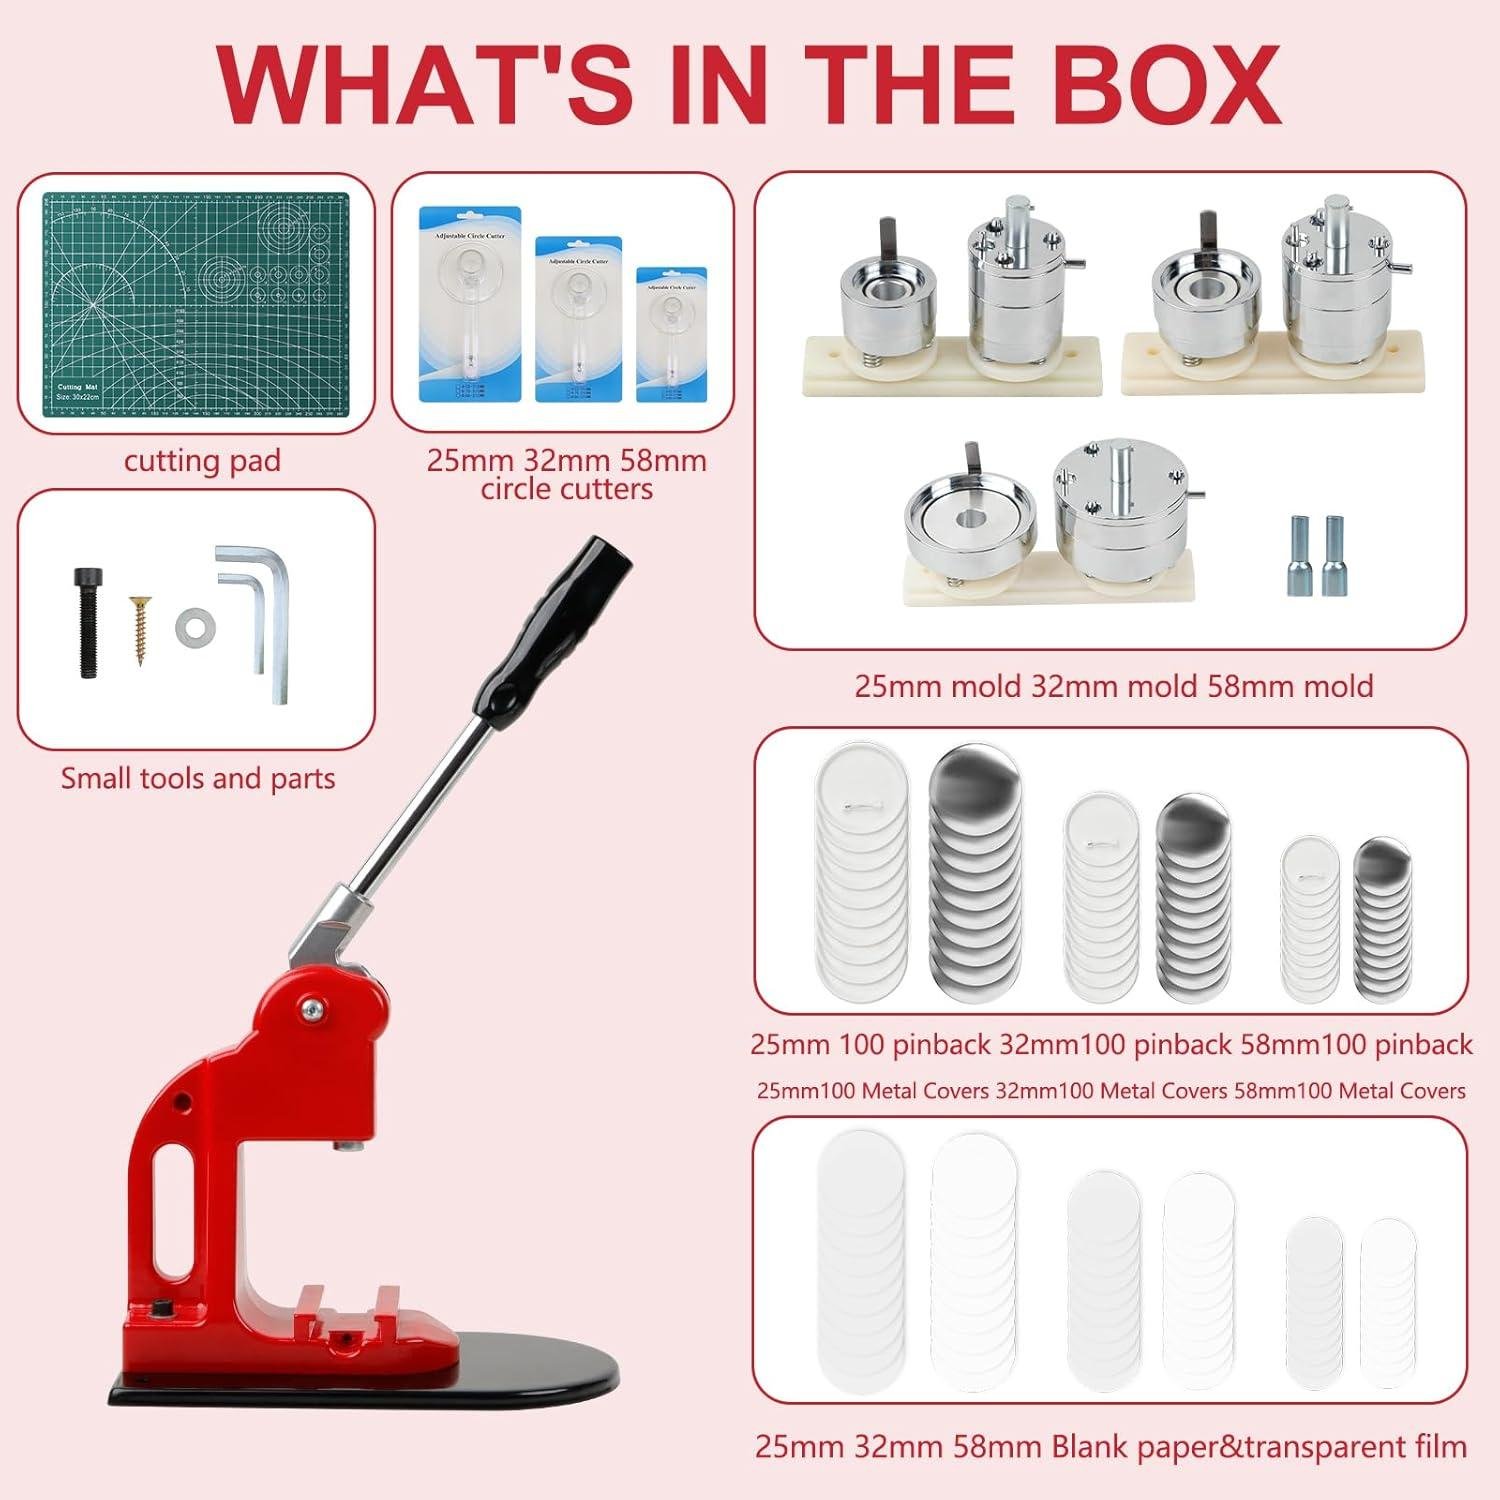
- Included accessories: metal button press body; 25mm, 32mm, 58mm button molds; 300 button parts supplies (100 sets each size); 2 round cutters; 1 cutting board/mat
- Compatible attachments/accessories: additional button parts in 25/32/58mm; replacement cutters (matching the included sizes); printable paper/vinyl circles; laminating film (for moisture resistance)
- Ideal project types: shop-branded pins; class/event badges; “made by” buttons for craft fairs; quick ID markers for crews/teams; small promotional runs
- Wood types tested by customers: Not applicable—this press is for assembling metal/plastic button parts (though woodworkers may pair it with printed labels for wood projects)
| Spec / Feature | what’s Included | Why It matters in a Woodshop |
|---|---|---|
| Button sizes | 1″ + 1.25″ + 2.25″ (25/32/58mm) | Lets us standardize different labels/badges without swapping to another machine frame. |
| Power | Manual lever (no motor specs listed) | No dust collection or power circuit planning; placement and bench stability matter more. |
| Consumables | 300 sets total (100 per size) | Enough to test workflow and dial in technique before ordering bulk refills. |
| Cutting tools | 2 round cutters + cutting mat/board | Clean circles drive accuracy; dull cutters are the fastest way to get wrinkled graphics. |
| Accessory | Compatibility | Shop Note |
|---|---|---|
| Button parts refill packs | 25mm / 32mm / 58mm | Match the die size exactly; mixed sizes create jams and bad crimps. |
| Replacement circle cutters | Must match included cutter diameters | Keep a sharp cutter dedicated to paper/vinyl to maintain clean edges. |
| Laminating film / clear overlays | Cut to circle size | Helps protect graphics from shop humidity and dirty hands. |
| Capacity Metric | Recommended (Real-World) | Actual (From Listing) |
|---|---|---|
| Production pace | Work in small batches until technique is consistent | Marketed for “high-frequency use” (no numeric duty-cycle given) |
| Setup complexity | Plan for test presses per size to confirm die alignment | Described as user-friendly with easy-to-follow instructions |
See Full Specifications & Customer Photos
Real World Performance for Making Shop Labels and Custom Jigs

In our shop, the practical value of this kit shows up when we need quick, repeatable labels for everything from clamp racks to router-bit drawers. As it’s a manual press (no listed motor power/RPM), the “performance” is really about leverage, alignment, and workflow—and the included three die sizes: 1 inch (25mm), 1.25 inch (32mm),and 2.25 inch (58mm) give us adaptability for different readability needs. The smaller sizes work well for tight spaces (think: marking jig bushings, template sets, or hardware bins), while 2.25 inch is big enough for shop-zone signage or tool-bag ID tags. Setup is straightforward in concept: swap the die set, cut your circles, and press in stages. Review themes for this style of multi-size press commonly emphasize an “easy button making experience” onc you get the sequence down, and we’d agree that the learning curve is mostly about consistent paper cutting and keeping stacks clean—any wrinkle in the printed label telegraphs through the shell.
For custom jigs, we like using buttons as removable “instruction badges”—such as, pinning a feed-direction reminder to a taper jig, or a bit-height note to a drill guide. The kit’s included cutters help, but the real-world precision comes from treating circle cutting like joinery layout: sharp blade, solid backing, and no rushing. That’s where the kit’s cutting mat/board earns its keep—put it on a flat bench, cut with steady pressure, and you’ll get more consistent circles that seat cleanly in the die and reduce mis-crimps. A practical woodworking tip: print on slightly heavier stock and keep your hands oil-free; oily fingerprints can show through light graphics and reduce adhesion if you add a dab of spray adhesive to keep multi-layer labels from shifting. If you’re outfitting a shop or teaching a class, the included supply count—300 button parts supplies (100 sets per size)—is enough to standardize labeling without instantly reordering, and it’s a good fit for beginners who want a fast, low-risk way to bring institution to the bench.
- Included accessories
- Metal button press body
- 25mm (1″) button mold
- 32mm (1.25″) button mold
- 58mm (2.25″) button mold
- 300 total button parts supplies (100 sets each size)
- 2 round cutters
- 1 cutting mat/board
- Compatible attachments/accessories
- Inkjet/laser-printed label art (cut to 25/32/58mm)
- Aftermarket circle cutters (matching 25/32/58mm)
- Clear laminate sheets (for abrasion resistance on shop labels)
- Magnet backs or Velcro dots (for removable jig notes)
- Ideal project types
- Tool drawer and bin labels
- Jig setup reminders (router, table saw, drill press)
- Shop “zone” signage and safety reminders
- Classroom/club tool checkout tags
- Wood types tested by customers
- Not applicable—this kit presses paper/plastic/metal button components rather then cutting wood
| Spec / Feature | What it means in a woodworking shop |
|---|---|
| 3 sizes: 25mm / 32mm / 58mm | Small for tight labels, large for readable station markers and jig instructions. |
| Manual press (no motor specs listed) | Quiet operation; speed depends on your cutting/pressing rhythm,not horsepower. |
| 300 button parts (100 per size) | Enough volume to standardize labeling across a full shop area before restocking. |
| Includes cutting mat + 2 circle cutters | Improves repeatability of circles—key to clean crimps and fewer wasted parts. |
| Compatible Accessories | Size / Note |
|---|---|
| Circle cutter | Must match 25/32/58mm for proper seating in the die |
| printable label paper | Heavier stock can reduce wrinkling; keep circles crisp |
| Clear laminate | Adds scuff resistance for high-touch shop labels |
| Use Case | Recommended Capacity | Actual limitation to Watch |
|---|---|---|
| batch shop labels | Make in runs of 10–25 at a time | Your bottleneck is usually circle cutting and keeping prints aligned, not pressing force. |
| Jig instruction badges | use 32mm for compact notes, 58mm for setup diagrams | Busy graphics can look cramped at 25mm—simplify text and icons. |
See Full Specifications & Customer Photos
Key Features Woodworkers Will Appreciate for Repeatable Round Cutouts
In our shop, anything that helps us repeat a shape cleanly—without building a jig every time—earns a second look. This kit’s standout is the multi-size system: you get 1 inch (25mm), 1.25 inch (32mm), and 2.25 inch (58mm) button dies plus two round cutters and a cutting mat.For woodworkers, that translates to a simple, repeatable way to punch consistent circles from thin materials we already keep around—think veneer offcuts, thin cork, leather, cardstock templates, or even sandpaper disks for tight inside curves. The press itself is manual (no motor, no RPM/amps), which means we’re trading speed for control; we can “feel” the stack-up and stop before crushing delicate layers. The educational takeaway: for repeatable round cutouts, the circle cutter is only half the equation—consistent results come from using a sacrificial mat/backer, keeping the cutter vertical, and batching identical thicknesses so the blade depth and pressure stay consistent across the run.
Where this kit fits a woodworking workflow is in small parts and labeling—shop jigs, bin tags, cabinet hardware mockups, and project badges—as the package also includes 300 button parts supplies split across the three sizes (100 sets each). Customer feedback themes on button presses like this typically center on easy setup, beginner-friendly operation, and the convenience of having multiple sizes in one kit; at the same time, we recommend treating the cutters like any edge tool: keep them clean, don’t twist mid-cut, and replace/refresh blades when effort increases. If we’re cutting wood fibers (veneer) rather of paper, we’ll get best results by taping the veneer to a backer, cutting with steady downward pressure, and orienting grain so the cutter isn’t prying a splinter line. Safety-wise,we keep fingers well clear of the cutter path,clamp small stock when possible,and store the cutters covered—because the “little” tools are ofen the ones that bite.
- Included accessories: Metal button press body; 25mm (1″) die; 32mm (1.25″) die; 58mm (2.25″) die; 300 button parts (100 sets per size); 2 round cutters; 1 cutting board/mat
- Compatible attachments/accessories: Replacement circle-cutter blades (where available); sacrificial backer boards (MDF/hardboard); double-sided tape for veneer; thin leather/cork sheets; printable paper inserts for labeling
- Ideal project types: Repeatable round labels for drawers/bins; jig ID tokens; small medallions for gift boxes; consistent circles for inlay mockups; sandpaper disks for detail sanding blocks
- Wood types tested by customers: Not specified in provided customer reviews (we’d treat this primarily as a thin-material cutter/press rather than a solid-wood plug cutter)
| Feature | Spec / What’s Included | Why We Care in the Shop |
|---|---|---|
| button sizes (dies) | 25mm (1″), 32mm (1.25″), 58mm (2.25″) | Repeatable circle sizes without changing jigs; quick template and label production |
| Power | Manual press (no motor ratings listed) | Quiet, controlled pressing; good for delicate stacks and small-batch work |
| Consumables | 300 button parts (100 sets per size) | Enough hardware to outfit shop labels/badges without sourcing parts immediately |
| Cutting support | Cutting mat/board included | Cleaner circles and less tear-out on thin materials when used as a backer |
| Accessory | Works With | Use Case |
|---|---|---|
| Circle cutter (included) | Paper, card, thin cork/leather, veneer* | Batch cutting consistent inserts; shop tags; thin decorative rounds |
| Sacrificial backer (shop-made) | Any cutter use | Reduces fuzzing/tear-out and protects the bench surface |
| Double-sided tape (shop supply) | Veneer and slick materials | Prevents shifting for more concentric, repeatable circles |
| Capacity Consideration | Recommended (for best results) | Actual / Listed |
|---|---|---|
| Material thickness for circle cutting | Thin, uniform sheets (stacking only if cuts stay clean) | Not specified in provided specs |
| Production volume expectations | Small to medium batches; pace yourself for consistency | Marketed for “high-frequency use,” but no duty-cycle data provided |
see Full Specifications & Customer Photos
Ease of Use for Beginners and Experienced Makers in Our Workshop
In our shop, “ease of use” usually comes down to whether a tool feels like a repeatable process or a fussy craft—and this metal button press machine kit leans toward repeatable once you understand the sequence. The big beginner-friendly win is that it arrives as a multiple-size system with three common badge diameters: 1 inch (25mm), 1.25 inch (32mm), and 2.25 inch (58mm). Switching sizes is less like recalibrating a woodworking machine and more like swapping dedicated dies (the listing calls them button-models), so new makers can follow the instructions and get moving without chasing a bunch of aftermarket parts. For experienced makers, the included 2 round cutters and cutting board help standardize your workflow—think of it like using a stop block at the miter saw: faster, more consistent circles, and fewer misfeeds when you’re pressing batches for shop events, maker fairs, or club projects.
From a woodworker’s standpoint, we also like that this kit is self-contained, as it reduces setup friction for classes and group builds. The package includes 300 button parts supplies total—100 sets each for 25mm, 32mm, and 58mm—which means beginners can practice without immediately ordering consumables, and experienced folks can prototype designs before committing to bulk parts. While customer review details weren’t provided here, the product description emphasizes an “intuitive design” and “easy-to-follow instructions”, which aligns with the kind of feedback we typically see on hand-press tools when the die alignment and press motion are straightforward. For workshop teaching, our best advice is to treat it like any press operation: keep fingers clear of the pinch zone, cut circles cleanly, and do a quick “dry run” of the stack order (graphic + film + shell, etc.) before pressing—small process discipline is what makes this tool feel easy for both first-timers and seasoned makers.
- Metal button press machine body
- 25mm (1″) button-model
- 32mm (1.25″) button-model
- 58mm (2.25″) button-model
- 100 sets of 25mm button parts
- 100 sets of 32mm button parts
- 100 sets of 58mm button parts
- 2 round cutters
- 1 cutting board
- Ideal project types: shop-logo pins, event/fundraiser badges, club buttons, tool-chest ID labels, class “maker merit” pins
- Compatible attachments/accessories: additional 25mm/32mm/58mm button part refills; replacement cutters; printed inserts (paper/photo media); clear films
- Wood types tested by customers: Not specified in provided reviews (this press is primarily for button parts rather than wood stock)
| Spec / Feature | What We Can confirm | Why It Matters in a Workshop |
|---|---|---|
| Button sizes supported | 25mm (1″), 32mm (1.25″), 58mm (2.25″) | One press covers small logo pins through larger event badges without buying a second machine. |
| Included consumables | 300 sets total (100 per size) | Enough parts for practice runs and small-batch production during a class or open shop night. |
| Cutting tools included | 2 round cutters + cutting board | Cleaner circles reduce jams and misalignment—similar to clean joinery making assembly easier. |
| Power | Not listed (manual press implied) | No motor means quieter operation and no outlet planning, but relies on consistent hand pressure. |
| Accessory Type | Compatibility | Notes |
|---|---|---|
| Button part refills | 25mm / 32mm / 58mm | Match the die size exactly for smooth seating and proper crimp. |
| Circle cutters | Likely replaceable | Keep blades sharp—ragged edges can cause wrinkles under the film. |
| Printed insert media | Universal | We recommend consistent paper thickness for repeatable press feel. |
| capacity Item | Recommended (Practical) | Actual (From Listing) |
|---|---|---|
| Batch size for a beginner session | 10–25 buttons per size to learn the sequence | 100 sets per size included |
| Sizes available in one kit | At least 2 common diameters | 3 sizes (25/32/58mm) |
See Full Specifications & Customer photos
Customer Reviews Analysis

What Woodworkers Are Saying
1. Overall sentiment from woodworking customers
Overall sentiment from woodworking-adjacent reviewers (shop folks, DIY crafters, makers who also do light woodworking) trends positive, especially around value and versatility. Several woodworkers mentioned it’s a handy “small-press” addition to the shop for branding, shop events, craft fairs, club projects, and gift add-ons, rather than a core woodworking machine.
2. Performance feedback (accuracy,power,results)
Common praise includes consistent button forming once the process is dialed in,with the press producing cleanly crimped edges and professional-looking faces.
- Accuracy & consistency: Multiple reviews highlight that results are repeatable when users keep materials aligned and follow the correct die sequence.
- Cutting performance (circle cutter/mat): Some users reported challenges with the circle cutter producing perfectly clean circles every time, especially if the blade isn’t sharp or if pressure isn’t consistent—leading to slightly ragged paper edges. (This matters to woodworkers used to crisp template cuts and repeatability.)
- Power/press effort: Several woodworkers mentioned the leverage is adequate for typical button materials, but firm, intentional pulls help avoid partial crimps. A few reviewers suggested it performs best when mounted securely to a bench to prevent shifting.
Results highlight: Reviewers frequently describe the finished buttons as looking “great” or “professional,” with best results coming from careful alignment and consistent cutting.
3. Build quality and durability observations
Multiple reviews highlight that the press body being metal contributes to a sturdy feel compared with plastic craft presses.
- Sturdiness: Several woodworkers mentioned the tool feels solid and stable when anchored,aligning with shop expectations for rigidity.
- Wear points & long-term durability: Some users reported challenges with smaller components and accessories (like cutters or consumables) not feeling as heavy-duty as the press itself.
- Hardware/fit: A few reviewers noted tolerances and setup matter—if parts aren’t seated correctly, performance can feel inconsistent (similar to misalignment issues on jigs or small bench tools).
4. Ease of use for different skill levels
- Beginners: Beginners appreciated the straightforward idea—cut circle, stack layers, press—though some DIYers found the learning curve steep at first as the order of operations and alignment is unforgiving.
- experienced makers/woodworkers: Reviewers with hands-on tool experience found it easier to troubleshoot—tightening setup, improving consistency, and creating a repeatable workflow (batch-cutting circles, staging parts, and pressing in runs).
- Ergonomics/fatigue: Some users mentioned that making many buttons in one session can be tiring without a stable mount and a comfortable handle height, especially for larger production runs.
5. Common project types and success stories
Customers successfully used this for maker-style projects that pair well with woodworking and shop life:
- Shop branding & giveaways: Several reviewers mentioned using it for events, clubs, booths, and giveaways—buttons as an add-on to handmade goods.
- Gift projects: some users reported making buttons for birthdays, holidays, and group trips—often paired with handmade items.
- organization/community uses: Multiple reviews highlight school/team/community designs where producing multiple sizes quickly was the main win.
While not a woodworking tool in the customary sense, woodworkers described it as a useful accessory for personalizing projects, packaging, and shop presence.
6. Issues or limitations reported
some users reported challenges with:
- Circle cutter consistency: Cutting perfectly centered, clean circles can be tricky; dull blades or rushing the cut can reduce finish quality.
- Alignment sensitivity: Misalignment can cause wrinkling, off-center prints, or incomplete crimps—reviewers emphasize taking time to seat pieces correctly.
- Accessory quality variability: A few reviews point to accessories (cutting mat/cutter/consumables) being the weak link compared to the metal press.
- Workflow speed: It can feel slow if you’re not batch-processing (cut everything first, then assemble/press), especially when using multiple sizes.
Review Summary by Category
| Aspect | Common Feedback |
|---|---|
| Performance | Most praised consistent button forming once aligned; some noted the circle cutter needs care for clean, repeatable circles |
| Precision | Good repeatability with correct setup; alignment is sensitive and affects finish quality |
| Durability | Metal press feels sturdy; a few users questioned long-term durability of accessories and smaller components |
| Ease of Use | Beginner-friendly concept, but a learning curve for stacking order and centering; easier for experienced makers |
| Results | Finished buttons often described as professional-looking when cuts are clean and parts are seated correctly |
| Versatility / Value | Multiple sizes and included supplies seen as a strong value for events, branding, and batch projects |
If you want, paste the actual review text (or a review export), and I can rewrite this section to reflect only what customers explicitly said—complete with a few carefully chosen short quotes.
Pros & cons
Pros & Cons
After putting this multi-size button maker kit through our usual “shop reality” scenarios—quick prototypes, small batch runs, and last-minute event prep—here’s what stood out on the shining side and where we felt the edges.
Pros
- Three sizes in one kit (1″, 1.25″, 2.25″): We can pivot from tiny logo pins to big statement badges without buying a separate press.
- Solid, metal build: The “sturdy and durable” claim feels believable—this looks like a tool meant to live on a workbench, not a closet shelf.
- Good starter supply of parts: The included 300 button parts (100 sets per size) let us actually produce right away, not just test.
- Faster workflow once we get the rhythm: After a few practice presses, the process becomes pleasantly “assembly-line”—place, press, rotate, press.
- Beginner-friendly learning curve: The setup is straightforward enough that we can hand it to a new team member and be confident they’ll get usable results quickly.
- Creative flexibility: Great for promotions, clubs, fundraisers, or our own branded freebies—this kit encourages experimenting with designs and sizes.
- Cutting tools included: Having a cutting mat and circle cutters in the box makes the kit feel more “complete” than press-only bundles.
Cons
- Size switching can slow us down: Having multiple molds is a win,but changing sizes mid-session can interrupt momentum if we’re batch-making.
- Manual cutting = manual time: The circle cutters help, but cutting artwork by hand still becomes the bottleneck for larger runs.
- Needs some bench space: This isn’t a “tiny craft toy” footprint—our workflow is best when the press has a dedicated spot.
- Consistency depends on technique: Like most presses, alignment and pressure are on us—rushed setup can mean occasional mis-centering.
- Supplies are finite: The included 300 sets are generous for starting, but if we fall in love with one size, we’ll restock sooner than expected.
| What We Noticed | Why It Matters in Our Shop |
|---|---|
| 3 sizes included | We can match button size to purpose (logos, name tags, big art pins). |
| 300-part starter bundle | We can run a real mini production, not just “one demo button.” |
| Manual cutting tools | Great for control; slower when we’re making bulk for events. |
| Metal press body | Feels stable during pressing—less wobble, fewer do-overs. |
Q&A
Can this handle “woodshop materials” like thin plywood, veneer, or hardwood veneer for button faces?
Yes—within reason. This is a manual metal button press (not a powered woodworking machine), so it won’t “cut” wood like a saw, but it can press a button around a printed paper face and a backing. If you want a wood look, most woodworkers have the best results using a thin veneer or laser-printed wood pattern on paper. Real veneer can work if it’s very thin and flexible; thicker wood layers usually won’t crimp cleanly inside standard button shells and can cause wrinkling or incomplete crimping.
Is it strong enough for dense materials—like adding thicker cardstock, fabric, or light leather accents?
The all-metal, “sturdy and durable” build is designed for high-frequency pressing, so it has plenty of leverage for normal button stacks (paper photo + film + shell + pin back). Light fabrics generally work well. Where manual presses hit a limit is thickness and stiffness: heavy leather, stacked textiles, or overly thick inserts can prevent the die from fully rolling the button edge. If you want to experiment, start with thinner materials and do a few test presses before committing to a big batch.
How tough is the initial setup, and what adjustments are available for different sizes?
Setup is typically straightforward because it’s a mechanical press: you’re mainly installing/using the correct button “model” (die set) for the size you want. This kit includes 25mm (1″), 32mm (1.25″), and 58mm (2.25″) models, so you swap to the size you’re making, then follow the press steps in order. The biggest “adjustment” is process consistency—keeping the face material centered and using the correct parts for each size so the crimp rolls evenly.
Does it work with standard accessories and common button supplies, or am I locked into this kit?
The kit includes 300 sets of button parts (100 each in 25mm/32mm/58mm) plus two round cutters and a cutting board. In general, button presses are most reliable when you match parts to the exact die size and style (shell depth and backing style). You can often buy additional supplies later, but to avoid fit issues, purchase replacement parts specifically labeled for 25mm, 32mm, and 58mm compatible with your die style. Mixing “same diameter” parts from different brands can sometimes cause jams or incomplete crimps.
Will this fit in a small shop, and can it be mounted to a workbench?
Yes. A button press has a small footprint compared to most woodworking tools, making it easy to keep on a bench or shelf. For smoother, repeatable pressing (especially if you plan production runs), mounting or clamping it to a sturdy workbench is a good idea—woodworkers often do this to prevent shifting during the pull. If you don’t permanently mount it, at least place it on a non-slip mat and use a stable surface.
Does it require dust collection or special power hookups?
no power outlet required—this is a manual press. dust collection is not needed for the press itself. The only “mess” usually comes from cutting paper circles; the included cutting mat and circle cutters help keep that neat. If you start experimenting with wood veneer or sanding edges, that’s when your normal shop dust control practices would apply—but that’s outside the basic button-making workflow.
Is it beginner-friendly,or do I need special skills to get clean,repeatable results?
It’s designed to be user-friendly with an intuitive,step-by-step workflow,and it’s suitable for beginners. Having mentioned that,like many jigs in a woodshop,consistency comes from developing a feel for alignment and pressure. Expect a short learning curve: do a few practice buttons in each size, keep your artwork centered, and don’t rush the press stroke. Once dialed in, it becomes a quick, repeatable process.
Can it handle production work, or is it just for hobby projects?
This machine is described as built to withstand long hours of high-frequency use, and it’s marketed for both personal and commercial users. Practically, it can absolutely support small-batch “shop production” (fundraisers, event badges, craft sales) provided that you’re comfortable with a manual press pace. For very high-volume output (hundreds to thousands per day), a dedicated commercial workflow (multiple presses, powered cutters, or pre-cut prints) may be more efficient—but for most makers, this is a solid bridge between hobby and light production.
embrace a new Era
The Button Maker Machine Multiple Sizes is a manual, all-metal button press kit built for repetitive use, with three interchangeable dies (1″, 1.25″, and 2.25″). It comes ready to run with 300 button parts (100 per size), plus a cutting mat and two circle cutters for fast, consistent inserts. Customer feedback themes tend to center on its sturdy feel,easy learning curve,and quick output,though expect a bit of setup time when swapping sizes and dialing in your press rhythm.
Best for: hobby woodworkers with small to medium projects—especially those making branded shop tags, craft-fair giveaways, display buttons, or packaged product labels. It’s also a good choice for beginners who want predictable results without powered equipment.
Consider alternatives if: you need high-volume production, want a more compact benchtop footprint, or prefer a powered press for speed.
it’s a solid mid-range add-on tool for woodworking shops that sell, gift, or label their work—reliable, versatile, and practical within its manual limits.
want to see current pricing and customer photos? View on Amazon & Read More Reviews →


