

Blog
FREDBECK Barn Door Kit Review: Right for Our Shop?
Ever tried squeezing a traditional swing door into a tight shop corner or remodel niche, only to realize the door arc steals your precious workspace—and your measurements have to be dead-on for the hardware to run true? That’s where a pre-sized sliding barn door kit can feel like a smart woodworking shortcut, as long as the build quality and alignment are there.
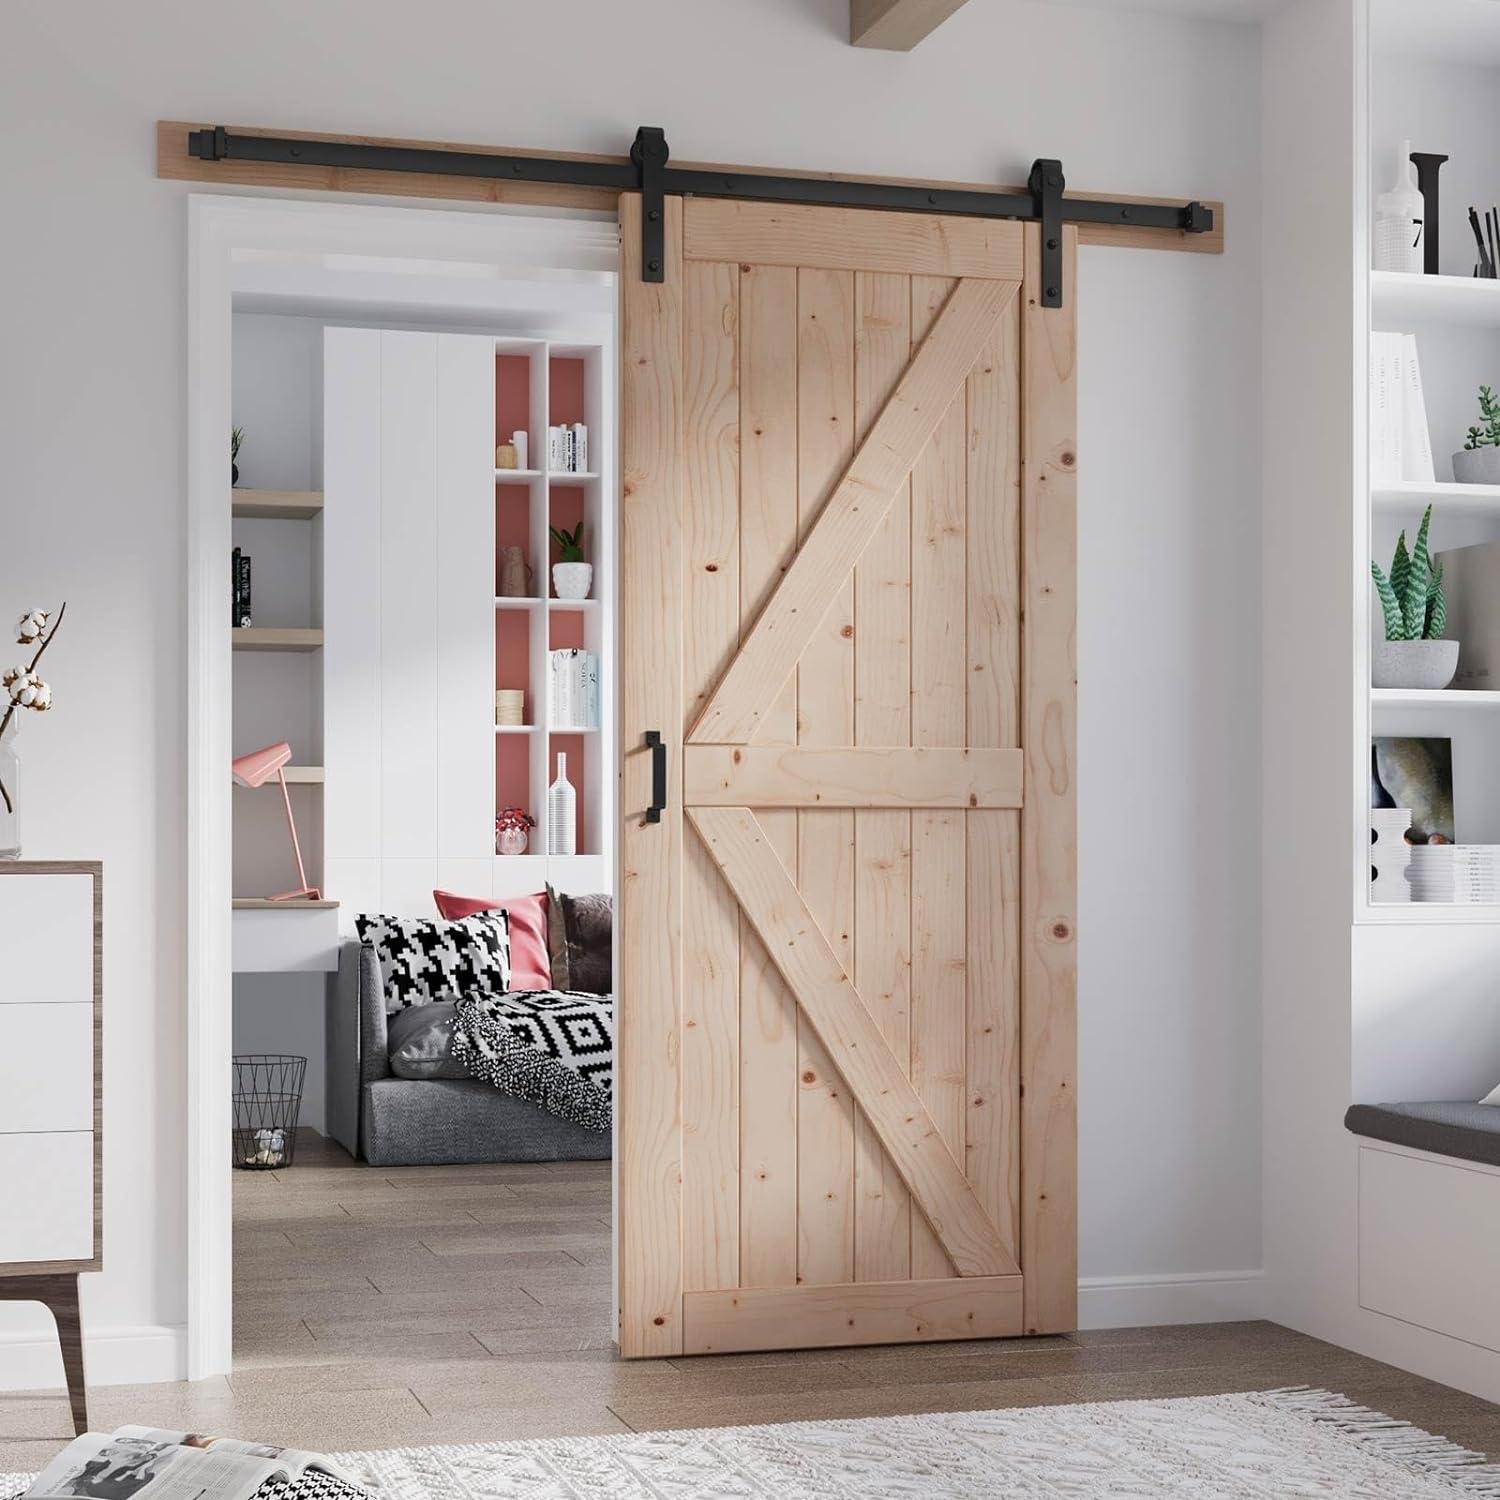
The FREDBECK 36in x 84in Wood Barn Door pairs a solid spruce panel door (1 3/8″ thick, 1/2″ solid core) with a 6.6FT track kit—including two hangers, spacers, a floor guide (with a pre-made bottom groove), and a pull handle—and it arrives ready for assembly, with mitered panels meant to fit snug.
In this review, we’ll look at what the specs suggest about precision, durability, and ease of install, plus how it fits small-shop realities and the budget vs. custom-build question.We’ll also weigh real customer feedback—many reviewers report easy assembly, solid wood feel, good stainability, and smooth function, while a few flag hardware quirks or occasional warped boards.
We’re woodworkers who’ve hung doors, chased level tracks, and learned that “simple” projects get serious fast when tolerances stack up.
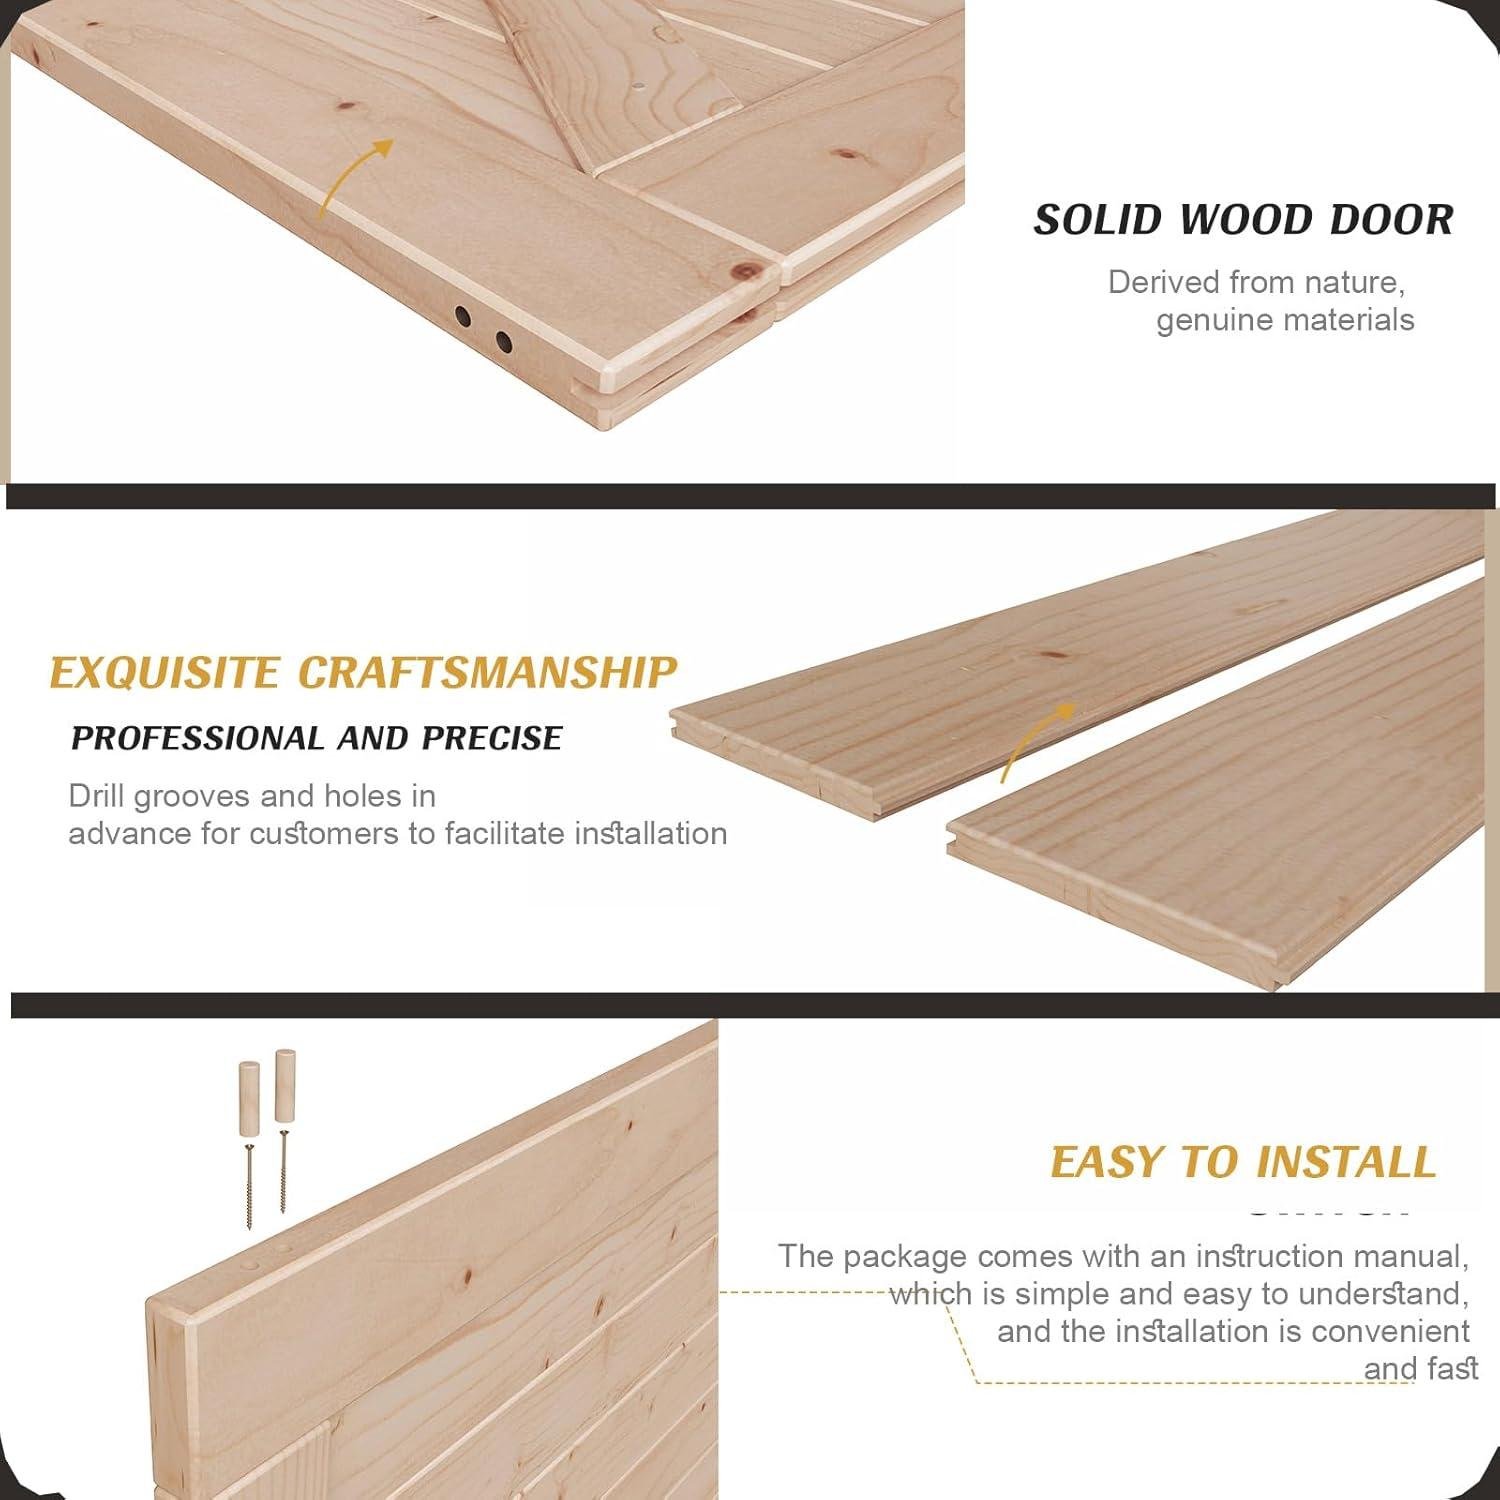
First impressions and spruce Panel build Quality

When the FREDBECK kit first hit our shop floor, the biggest “first impression” wasn’t the countryside styling—it was that this is an assembly-required, real-wood project that behaves more like a flat-pack glue-up than a prehung door. The door panel is sized at 36in W x 84in H with a stated 1 3/8in thickness and a 1/2in solid-core centre, built from solid spruce with mitered panel edges for tighter seams. That miter detail matters in the shop: it can hide slight seasonal movement better than square butt joints,but it also means we want our clamps,mallet strikes,and screw pressure to be even so we don’t open corners.Reviewers consistently echo that the pieces are “predrilled,” “labeled,” and “fit together with no slop,” and we agree that’s the difference between a stress-free assembly and a Saturday ruined by chasing alignment. Multiple customers also describe the finished door as sturdy with “good weight” and even “no warping,” though there are a few notes about occasional warped boards and some finish prep being needed before stain.
Build-quality-wise, spruce is a practical choice for a barn door in a home shop because it’s workable with common tools—drill/driver, clamps, and a block plane for minor proud spots—while still offering a clean grain that can take stain nicely when prepped correctly.Several reviewers say it “stained very easily” and produced a “gorgeous finish after staining,” but one theme we’ve seen (and we teach newer woodworkers to watch for) is that blotchy absorption can happen on softwoods like spruce—so sanding consistently and using a pre-stain conditioner can save a lot of frustration. On the assembly side, customers recommend using wood glue to reduce slat movement, protecting the face while tapping dowels to avoid dents, and keeping a long Phillips bit handy.We also noticed a recurring quality-control gripe: a few buyers say some of the included screws are barely long enough to bite, leading them to swap hardware for better hold and improved flushness. For woodworkers, that’s not a deal-breaker—it’s just a reminder to treat this as a kit that may benefit from our usual bench habits: dry-fit first, glue sparingly (wipe squeeze-out immediately if staining), and keep a small assortment of screws on hand so we’re not halted mid-build.
See Full Specifications & Customer Photos
Real World Sliding Performance and Door Stability

In real-world use, the sliding feel is mostly dictated by the included 6.6FT track, the two hangers, and how true we get the mounting surface—not by the 36in x 84in spruce door itself. From a woodworker’s perspective, we treat barn-door hardware like a long fence: if the header isn’t dead-straight and anchored into studs, everything downstream gets fussy. Multiple customer reviews echo that the door “glides very quietly and easily” and “rolls very smooth and quiet,” which aligns with what we’d expect when the spacers are even and the track is level.That said, reviewers also spend a lot of words on the install learning curve—especially around track placement and stud alignment—so we’d recommend laying out your hole pattern before drilling and being willing to add a proper wood header (not included) when the track holes don’t land cleanly on framing members.
Door stability is where the kit’s practical details matter most: the slab is 1 3/8″ thick with a 1/2″ solid core, and the bottom edge comes with a pre-made groove for the floor guide. That groove is a real workshop-kind feature because it saves us routing a straight, consistent channel after assembly. Reviews consistently call the door “sturdy” with “good weight” and even mention no warping in some installs—good signs for spruce when it’s properly acclimated and sealed. The stability caveat is the guide: several customers point out the included guide typically needs to be mounted to the floor, which can be a non-starter over tile or concrete unless we’ve got the right masonry bit, anchors, and comfort drilling into the finished surface—one reviewer even resorted to temporary tape, while another recommended buying a diffrent guide for better stability. As woodworkers, we’d also watch for the occasional review theme about short screws on some panels; if the face slats aren’t pulled tight, the door can rack slightly and telegraph as wobble at the guide. A careful predrill/countersink routine, clamping during assembly, and upgrading fasteners where needed will do more for “door stability” than any marketing claim.
- Included accessories
- 1x 36″ x 84″ spruce barn door (assembly required)
- 1x 6.6FT track
- 2x hangers
- 5x spacers
- 1x floor guide (uses the door’s pre-cut groove)
- 1x pull handle
- Compatible attachments/accessories
- Stud finder + 4′ (or longer) level for accurate track layout
- Optional wood header board (common solution when track holes miss studs)
- Masonry drill bits/anchors if mounting the floor guide into concrete or tile
- Aftermarket wall-mounted guide (popular choice when you won’t drill floors)
- Upgraded wood screws (when supplied screws feel marginal for face slats)
- Ideal project types
- Closet conversions and laundry-room doors where quiet sliding matters
- Room dividers for remodels (reviews mention adding value and widening access)
- Shop-adjacent openings where we want a door that can be stained/painted to match cabinetry
- Wood types tested by customers
- Spruce (kit door material) — customers frequently cite “real wood” and good stain results
| Spec / Feature | What We Get (Per Listing) | Why It Matters in Sliding & Stability |
|---|---|---|
| Door size | 36″ W x 84″ H | Coverage affects side gaps; some reviewers upsized or added side boards to reduce visibility around trim. |
| Door thickness | 1 3/8″ (with 1/2″ solid core) | Stiffer slabs generally track more predictably at the guide and feel less “flimsy” when rolling. |
| Track length | 6.6FT | Layout must account for parking space; misplacement shows up as bind, noise, or limited opening. |
| Bottom groove | Pre-made groove | Improves stability and saves a routing step; guide install still depends on your floor type. |
| compatible Accessory | Use Case | Skill Level |
|---|---|---|
| Wall-mounted door guide | When we can’t/won’t drill into tile, hardwood, or concrete floors | beginner-friendly |
| Wood header board | When track holes don’t align with studs or we need to span uneven framing | Intermediate |
| Masonry bit + anchors | Floor-guide mounting over concrete | Intermediate |
| Better fasteners | Address reviewer complaints about short screws and keep slats tight/flush | Beginner-friendly |
| Capacity / Fit | Recommended (Best Practice) | Actual (What Reviews Suggest Happens) |
|---|---|---|
| Track mounting support | Fasten into studs or a solid header across the opening | Some report hole/stud mismatch and add a header; others say labeled parts and directions made it straightforward. |
| Floor guide install | Mechanically fasten guide through finished floor (or use wall guide) | Some can’t drill concrete/tile and use alternatives; several recommend a different guide for stability. |
See Full Specifications & Customer Photos
Key Features Woodworkers Will Appreciate in the Hardware Kit and K Brace Design
From a woodworker’s standpoint, the biggest win here is that FREDBECK doesn’t treat the hardware like an afterthought—the door ships as a 36″ x 84″ slab at 1 3/8″ thick (with a stated 1/2″ solid core thickness), and the kit includes a matched 6.6FT track that’s sized for the listed door. In the shop, that matters because we can spend our time on layout and finish instead of hunting compatibility charts. The K-shape brace design is also friendly to real-world assembly: the panels are described as mitered for a snug fit, and multiple reviewers echo that theme—parts “fit together with no slop,” “pieces lettered,” and “no missing pieces or hardware.” For us, that translates into less fussy clamping and fewer surprise gaps during glue-up. We’d still treat it like any panel/brace build: dry-fit every plank, mark reference faces, and pre-stage clamps so we’re not chasing alignment while fasteners are going in.
On the install side, the kit’s details make a difference in how cleanly the door runs day-to-day. The door comes with a pre-made bottom groove for the floor guide—exactly the kind of “factory step” we appreciate because it eliminates a router operation that many DIYers aren’t set up for. Customers repeatedly report the door “glides very quietly and easily” and “rolls very smooth and quiet,” which is what we want from the track/hanger interface. Still, we should plan our mounting like woodworkers, not like painters: a few reviews mention rail headaches such as track holes not lining up with studs and the need for a solid header board (not included), so it’s worth laying out a straight ledger/header into studs and checking plumb/level before drilling final holes. The included floor guide is functional, but reviewers also note it may require drilling into tile or concrete—so if our job calls for no-floor-penetration, we may prefer a wall-mounted guide or alternate guide style.
- Included accessories (per specs):
- 1x 36-inch barn door
- 1x 6.6FT track
- 2x hanger
- 5x spacer
- 1x floor guide (mates to the pre-grooved door bottom)
- 1x pull handle
- Compatible attachments/accessories (common add-ons woodworkers use):
- Header/ledger board (mount into studs when track holes don’t land perfectly)
- Long Phillips bit or bit extension (helps reach assembly screws cleanly)
- Wood glue (reviewers recommend it to reduce slat movement during assembly)
- Wall-mounted floor guide (if you can’t drill into tile/concrete floors)
- Alternative spacers (some users consider shorter spacers to reduce stand-off)
- Ideal project types:
- Closet conversions where swing clearance is tight
- Laundry room or pantry upgrades (barn-door aesthetic with practical access)
- Room dividers for remodels (reviewers mention creating a “3rd bedroom” use case)
- Stain/paint-ready door projects where we want to control final color and sheen
- Wood types tested by customers (reported):
- Spruce (this door’s material; reviewers call it “real wood” and “solid wood”)
| spec / Feature | What FREDBECK Lists | why It Matters in the Shop |
|---|---|---|
| Door size | 36″ W x 84″ H | Determines coverage vs. trim/gaps; also dictates track length needs. |
| Door thickness | 1 3/8″ (with 1/2″ solid core thickness stated) | Affects hardware spacing, guide fit, and how stout the door feels. |
| Track length | 6.6FT | Controls travel distance; needs good wall space for parking the door. |
| Bottom guide prep | Pre-made groove | Saves a routing step; improves alignment with the included floor guide. |
| Assembly style | Mitered panels, “need to assembly” | Dry-fitting and careful clamping help keep the K-brace clean and symmetrical. |
| Accessory | Included? | When We’d Use It |
|---|---|---|
| Floor guide | Yes | Standard installs where drilling into the floor is acceptable. |
| Wall-mounted guide | No | Tile/concrete floors or rentals where we don’t want floor holes. |
| Header/ledger board | No | If track holes don’t align with studs or the wall needs reinforcement. |
| Long Phillips/bit extension | No | Speeds assembly and reduces cam-out on deeper screw locations. |
| Installation Capacity Consideration | Recommended (Best Practice) | Actual/Reported by Customers |
|---|---|---|
| Track mounting | Hit studs directly or use a secured header board | Some report hole alignment issues with studs, leading to header solutions. |
| floor guide mounting | Drill appropriate substrate (wood/tile/concrete) with proper bits | One reviewer used double-sided tape due to lacking a concrete bit (works but is not the same as mechanical fastening). |
| Panel fastening | Use clamps, consider glue, and verify screw bite | Some mention the provided screws can be barely long enough for certain slats, requiring replacements. |
See Full Specifications & customer Photos
Ease of Assembly and Installation for Beginners and Experienced Woodworkers
For a kit-style door, we found the FREDBECK goes out of its way to be approachable—especially if we treat it like a panel glue-up in the shop rather of a “hang-and-go” slab. The door arrives as a 36in x 84in spruce assembly with a stated 1 3/8in thickness and 1/2in solid core,and reviewers repeatedly echo that it’s “easy to assemble” with parts that “fit together with no slop at all.” Multiple customers also mention clear directions and that parts are labeled/lettered, which is exactly what beginners need when they’re learning to keep joints aligned and faces flush. In practical terms, we’d set up a flat assembly surface, dry-fit first, then use wood glue sparingly (a common review tip is to wipe squeeze-out immediately so stain doesn’t “telegraph” glue spots). A long Phillips bit or driver helps reach into the corners, and a scrap block under a mallet keeps dowel taps from denting the spruce—basic technique, but it makes this project feel more like controlled woodworking and less like wrestling a prebuilt door.
Installation is where experience helps: the kit includes a 6.6FT track, and while many buyers say it was “easy to put together and hang” and that the door “rolls very smooth and quiet,”floor guide is designed to mount into the floor and the door has a pre-made groove to match, but customers point out this can be tricky on tile or concrete unless we have the right masonry bit (some improvised, others bought a different style guide). If we’re new, we’d recommend budgeting extra time for measuring, stud-finding, level-checking, and possibly sourcing slightly longer “just right” screws if our panels don’t cinch tight—because one recurring complaint is that some supplied screws can feel barely long enough to hold certain trim pieces flush.
- 1x 36-inch door (spruce, panel assembly required)
- 1x 6.6FT track
- 2x hangers
- 5x spacers
- 1x floor guide (door groove is pre-made to fit)
- 1x pull handle
- Wood glue (recommended by customer tips for tighter assembly)
- Long Phillips bit / bit extension (for deep fasteners)
- Stud finder + 4ft level (for mounting the track straight and secure)
- Header board (not included; often needed when studs don’t match rail holes)
- Masonry drill bit (if mounting the floor guide into concrete/tile)
- Alternative wall-mounted floor guide (for no-floor-drill installs)
- Closet conversions (replacing bifolds)
- Laundry room / bedroom transitions
- Basement remodel partitions
- Office/study sliding entry
- Spruce (included door material)
- Customer-finished with stain (multiple reviews: “stained very easily” / “beautiful finish after staining”)
- Customer-finished with paint/primer (several reviewers primed/painted successfully)
| Assembly/Install Stage | beginner Difficulty | Why It Matters in the Shop |
|---|---|---|
| Door panel assembly (dry-fit, glue, fasten) | Low–Medium | Labeled parts and “no slop” fit help, but glue control and squareness affect appearance and stain uptake. |
| Track layout and mounting (6.6FT) | Medium–high | Stud alignment and level are critical; may require a header board for reliable fastening. |
| Floor guide installation (door has pre-made groove) | Medium | Drilling into tile/concrete may require special bits or a different guide style. |
| Final adjustments (hang height, stops, plumb check) | Medium | Pre-drilled/kit hardware speeds things up, but small tweaks prevent rubbing and improve “quiet glide.” |
| Accessory/Attachment | Compatibility | Why We’d Use It |
|---|---|---|
| Wooden header board (stud-mounted) | Common add-on for barn door tracks | Solves “rail holes didn’t line up with studs” situations and stiffens the mounting plane. |
| Wall-mounted door guide | Often compatible with grooved doors | Avoids drilling into tile/concrete while still controlling door swing at the bottom. |
| Replacement screws (slightly longer, correct gauge) | As needed | Addresses customer reports that some small screws are “barely long enough” to keep trim tight. |
| Area | Recommended Planning Range | What Customers Report in Practice |
|---|---|---|
| Door assembly time | 60–120 minutes (plus finish time) | Many call it easy,but at least one reviewer said it stretched to 3+ hours due to fastening/flush-fit issues. |
| Install complexity (track + guide) | Allow an afternoon | Often straightforward, but measurement/stud alignment and floor-guide drilling can slow first-timers. |
See Full Specifications & Customer Photos
Customer Reviews Analysis
What Woodworkers Are Saying (Review Analysis)
1. Overall sentiment from woodworking customers
Overall sentiment skews positive, especially from DIY-minded woodworkers and finish-focused users. Several woodworkers mentioned this door kit delivers a “custom look” for far less than commissioning or building a barn door from scratch. Common praise includes solid materials, a good-looking finished result, and strong value—particularly compared to doors that “can run upward to $1,000 each.”
2. Performance feedback (accuracy,power,results)
Because this is a door + hardware kit (not a power tool),“performance” shows up in reviews as fit,glide,and finishing results:
- Smooth,quiet operation: Multiple reviews highlight that once installed,the door “glides very quietly and easily” and “rolls very smooth and quiet.”
- Fit and coverage results: Several woodworkers mentioned the door fit the opening well—“perfect size,” “no gaps,” and “fit the space perfectly.” Others noted that track standoff/spacers and header choices can create side gaps depending on your wall/trim situation.
- Finish outcomes: Customers successfully used this for staining and painting projects. Several reviewers mentioned it stains easily,with one noting a black stain/wipe-back technique to emphasize grain and achieve a weathered look.
3. Build quality and durability observations
Feedback trends positive on materials, with a few crucial caveats:
- Solid feel, good materials: Several woodworkers mentioned “quality materials,” “solid and true” wood, and a sturdy door once assembled.
- Hardware impression: Common praise includes “nice hardware,” though installation flexibility (stud alignment) mattered more than raw hardware strength.
- Wood variability: some users reported typical softwood issues—one board arrived warped, and another reviewer noted areas that “would not take the stain” evenly (grain/absorption inconsistency).
- Fastener limitations: One reviewer reported durability/hold issues with the provided small screws—the screws were “barely long enough to grip,” causing face boards to loosen or not sit flush until longer replacement screws were used.
4. Ease of use for different skill levels
Ease of use is generally rated as approachable, but installation skill and measuring accuracy strongly affect the experience.
- Beginners/DIYers: Many DIYers found assembly straightforward—parts labeled,no missing hardware,and a “pretty easy project to put together.” One reviewer completed it solo, but cautioned some steps are much easier with help (mounting the header into studs, hanging the door on the track).
- Intermediate/experienced woodworkers: Reviewers with more practical install experience tended to focus on process tips—using glue strategically, protecting the surface when tapping dowels, and avoiding glue squeeze-out where stain will go (because stain won’t cover glue residue).
- Learning curve is mostly in the rail/track install: Some users reported challenges with measuring and aligning the track to studs.One detailed review described the rail install as a “nightmare,” primarily due to limited hole placement relative to stud positions and confusing hardware instructions.
5. Common project types and success stories
Woodworkers and DIY remodelers used this kit as a cost-effective upgrade with visible “wow factor”:
- Laundry room upgrade: Several reviewers mentioned using it as a laundry room door replacement and calling it a “beautiful upgrade from a regular door.”
- Room conversion / adding privacy: Customers successfully used this for converting a den/open area into a bedroom, noting it opens wider than a swing door and makes moving furniture easier.
- condo/beach property refresh: One reviewer painted it to match a freshly painted beach condo for a clean, coordinated look.
- Design/finish customization: Multiple reviews highlight staining (espresso, black stain wipe-back) or painting and being happy with the final appearance.
6. Issues or limitations reported
Negative feedback clusters around instructions,wood consistency,and installation constraints rather than the final look.
- Instructions quality is inconsistent: one reviewer said the assembly instructions were “AI junk,” while others reported “excellent directions” and clearly lettered parts.
- Warping and stain absorption inconsistency: Some users reported a warped board and occasional blotchy/uneven stain uptake in spots.
- Track mounting limitations (stud alignment): Several reviewers mentioned challenges when rail holes don’t line up with studs. One suggested the manufacturer should provide more holes across the rail for better stud-matching flexibility.
- Floor guide requirement: Multiple reviews highlight that the door guide typically needs to be mounted to the floor—problematic for tile/concrete floors without the right bit or for those who don’t want to drill. Workarounds included heavy-duty tape or switching to a wall-mounted guide.
- Hardware spacing can create gaps: Some DIYers found the header/track spacers push the door outward, creating side gaps (especially if your trim/framing/opening width is tight).
- Assembly time can exceed expectations: One reviewer reported that what “should’ve taken no more than an hour” took over three due to side tightening and inadequate screw length for face panels.
Speedy Summary Table
| Aspect | Common Feedback |
|---|---|
| Performance (operation/results) | Quiet, smooth glide once installed; finished look frequently enough praised; fit can vary based on header/track spacing |
| Precision (fit/alignment) | Door can fit “perfectly” with no gaps, but successful alignment depends on careful measuring and stud placement |
| Durability / materials | Generally solid spruce and sturdy feel; occasional warped board or stain-absorption inconsistencies |
| Ease of assembly | Mostly straightforward with labeled parts; glue/dowel handling helps; some reports of longer-than-expected build time |
| Installation (hardware) | Most common pain point: rail mounting and stud alignment; floor guide requires drilling unless you use an alternative |
| Value | Strong value vs. sourcing lumber + hardware separately or buying higher-end prebuilt doors |
Pros & Cons

Pros & Cons
For our shop build, the FREDBECK 36in x 84in Wood Barn Door Kit feels like a “mostly there” package: a real-wood door with a clean, customizable look, plus a hardware set that (in many installs) gets the job done without a separate shopping list. Having mentioned that, it’s still a barn door project—meaning measurements, wall structure, and hardware placement can make or break the experience.
Pros
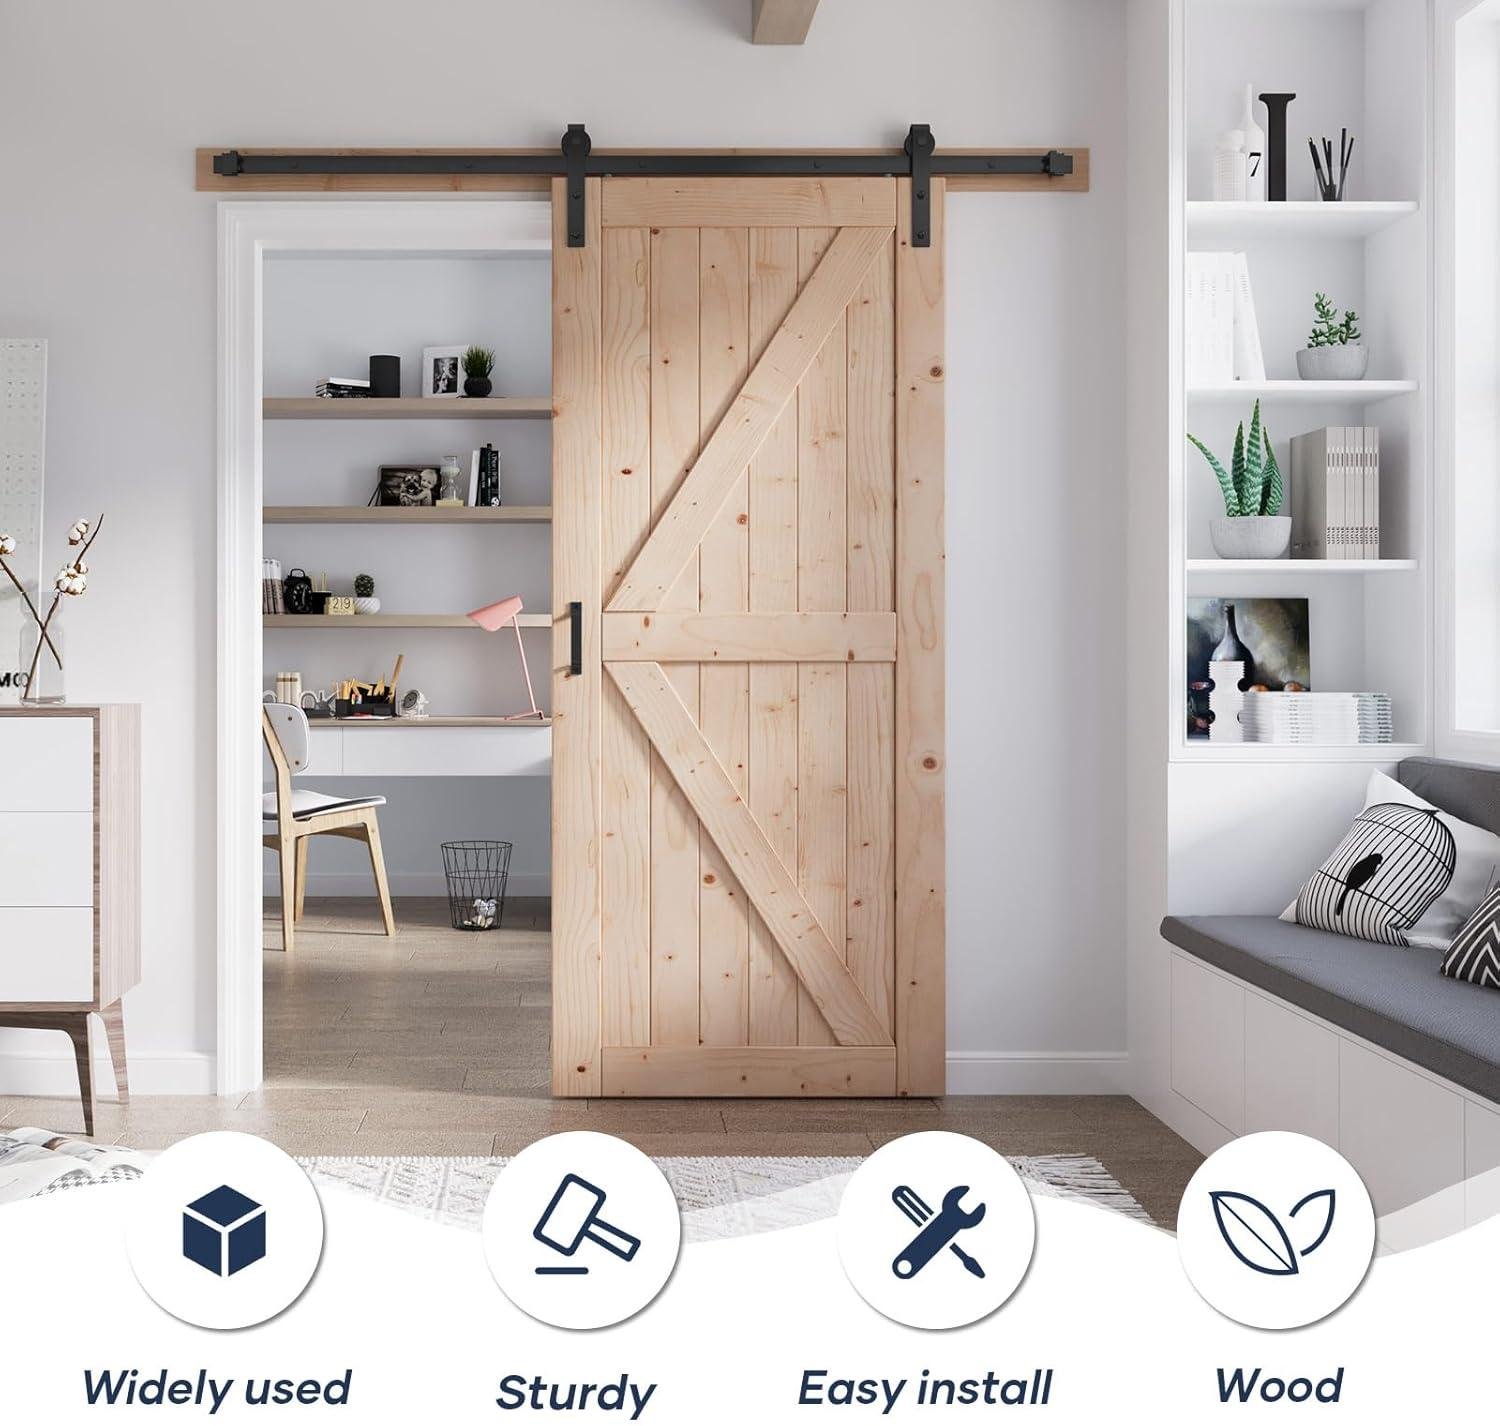
- Real spruce wood with a solid feel. Many owners call out the door as sturdy and “actual wood,” not hollow or particle-board.
- DIY-friendly assembly (for most of us). Pieces are predrilled and generally fit together well, which helps keep the build from turning into a puzzle.
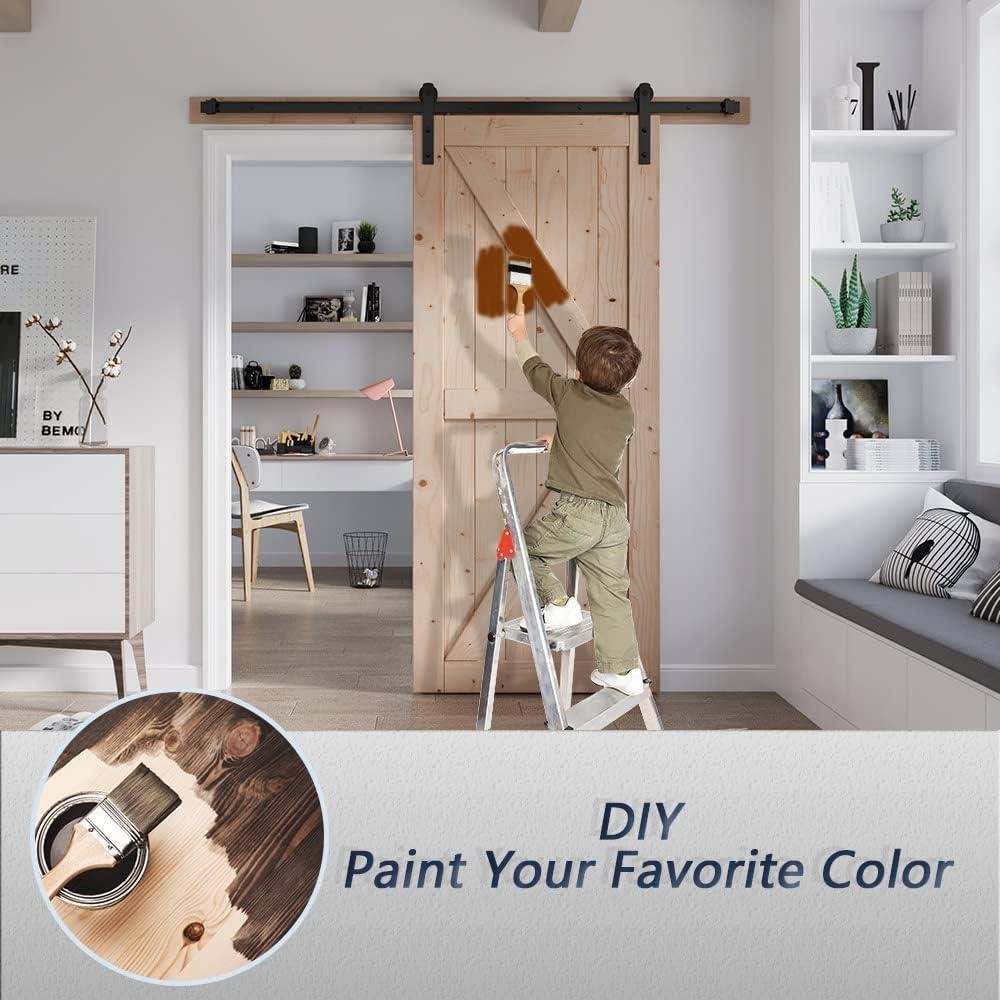
- Custom finish potential. The raw-wood approach lets us stain, paint, or weather it to match a shop vibe—farmhouse, industrial, or clean-and-modern.
- Hardware kit included. Track, hangers, spacers, floor guide, and pull handle are in the box—nice for value and fewer last-minute store runs.
- Quiet, smooth slide when installed correctly. Multiple reviewers mention good glide and solid everyday functionality.
- Good bang-for-buck versus building from scratch. When we price lumber + hardware separately, kits like this can undercut a DIY build (and definitely many big-box options).
Cons
- Assembly still takes real time. This isn’t a “hang it out of the box” door—every panel gets put together,and that can stretch a quick project into an afternoon.
- Instructions may be uneven. Some buyers report unclear directions, which can slow us down if it’s our first barn door install.
- Track-to-stud alignment might potentially be limiting. If the pre-drilled mounting pattern doesn’t land on studs where we need it, we may end up adding a header board (extra step, extra thickness off the wall).
- Floor guide requires commitment. The included guide typically mounts to the floor—fine in a wood subfloor,less fun on tile or concrete unless we’re ready to drill.
- Occasional hardware/fastener quirks. A few reviews mention screws being too short or anchors feeling flimsy—small, but annoying when we’re aiming for a “done once, done right” install.
- Wood variability is real. Being natural spruce, boards can arrive with cosmetic variation (and occasional warp), and stain can take unevenly in spots.
Quick Take (Our shop Checklist)
| What We Care About | How This Kit Typically Dose |
|---|---|
| Durability | Good—solid spruce feel, generally sturdy once assembled |
| Install Complexity | Medium—door assembly is straightforward; track placement is the “precision” part |
| Finish Options | strong—built for staining/painting (just watch glue squeeze-out) |
| Shop Practicality | Good—great for openings where a swinging door would steal space |
Bottom line for us: if we want an affordable, real-wood barn door look—and we’re comfortable measuring carefully, mounting solidly into studs (or a header), and possibly tweaking small hardware details—this kit checks a lot of boxes. If we need true privacy, perfect alignment with minimal gaps, or a “no-drill” floor solution, we should plan upgrades (like a different guide or latch) before install day.
Q&A
What wood is this door made from, and does it stain well?
This kit uses genuine solid spruce panels (not particleboard), with a listed door thickness of 1 3/8″ and a 1/2″ solid core thickness. Reviewers frequently call out the “real wood” feel and several mention it stains “beautifully” and takes clear coat well. A few customers did report occasional boards with uneven stain absorption (typical of softwoods like spruce), so if you want a very uniform stain, plan on using a pre-stain conditioner and wiping glue squeeze-out immediately (glue will block stain).
Is this sturdy enough for daily use, or is it just for light-duty/hobby installs?
For typical interior use (closets, laundry rooms, room dividers), customer feedback trends strongly positive on sturdiness and “good weight,” with multiple reviewers noting the door stayed true with no warping. The hardware kit includes a 6.6 ft track,hangers,spacers,floor guide,and a pull handle,which is what most DIY installs need. The main “pro-level” factor is your install: the track should be fastened into studs or a properly anchored header board,otherwise even a solid door can feel flimsy or drift out of alignment over time.
How tough is the initial setup and assembly (door + hardware)?
Most buyers say the door panels go together easily, with parts fitting “without slop,” and several mention labeled pieces and predrilling that speeds things up. The more challenging part is typically the track layout and mounting—getting the rail level, hitting studs, and setting consistent spacing. One detailed review mentioned rail hole placement didn’t always align with studs, which can force you to add a header board or adjust mounting strategy. Expect a straightforward build, but measure carefully and plan extra time for the wall hardware.
What woodworking tools and “shop basics” do I actually need to assemble it cleanly?
You don’t need a full cabinet shop, but you will want a drill/driver with a long Phillips bit (or extension), a mallet/hammer for dowels (protect the wood with a scrap block or cloth), a square, clamps if you have them, and wood glue (many reviewers recommend glue to reduce panel movement while you fasten). If you’re staining, do the stain/finish before final assembly when possible, and keep a damp towel handy to wipe any glue squeeze-out immediately.
will this fit in a small workshop, and can I assemble it on a bench?
Yes—because it ships as components, it’s easier to maneuver than a fully assembled 36″ x 84″ slab. You can assemble it on sawhorses or a sturdy bench, but you’ll still need clear space to lay out pieces and to flip/handle the full door once assembled. Multiple reviewers mention the boxes are heavy/awkward for one person, and hanging the finished door or mounting the header/track is much easier with a second set of hands.
Does it require special mounting, dust collection, or power—like a “tool” would?
This is a door kit, so there’s no power requirement and no dust collection needed unless you modify it (trimming, planing, sanding, or routing).The “workshop integration” concern here is wall structure: many successful installs use a wood header board anchored into studs (header not included) and then mount the track to that. If your wall layout doesn’t land nicely on studs,plan for a header or proper anchors—one reviewer called the included anchors “cheap/flimsy,” which is a cue to upgrade anchoring if you can’t hit framing.
do I need special skills to get a clean, professional-looking result?
A careful DIYer can get a pro-looking door—reviewers regularly mention the finished look and “beautiful” appearance after staining or painting.The learning curve is more carpenter than fine-woodworker: layout, level, stud-finding, and making sure the door clears trim while covering the opening the way you expect. If you’ve never installed a barn door, the track/header step is where most people struggle (not the door assembly).
Any known durability/maintenance issues or parts I should plan to upgrade?
Ongoing maintenance is minimal: keep the track clean, periodically check fasteners for tightness, and re-wax/finish the wood as needed. A few reviewers reported small hardware/fastener annoyances—like screws that felt too short for holding certain boards, or a lag bolt head breaking—so it’s smart to have your own quality screws/lag bolts on hand and upgrade fasteners if anything feels marginal. Also note the included floor guide typically mounts to the floor; if you have tile or concrete and don’t want to drill, some reviewers swapped to an alternate wall-mounted guide or used temporary solutions (which can work, but isn’t as “set-and-forget” as a proper mount).
unleash Your True Potential
The FREDBECK 36in x 84in Wood Barn Door pairs a solid spruce, K-shape plank design with a 6.6 ft sliding hardware kit, pre-grooved bottom guide slot, and a reversible install. In customer feedback, themes are consistent: easy assembly, sturdy/real-wood feel, and a finish that stains beautifully—with a few notes about occasional warped boards, weak/short screws, and hardware/install quirks (like needing solid stud layout or floor drilling for the guide).
Best for: hobby woodworkers and DIY remodelers who want a barn-door look without milling a door from scratch, plus beginners practicing layout, clamping, glue-up, and finishing on a functional project.
Consider alternatives if: you need tight privacy gaps, can’t drill your floor, want premium instructions/hardware, or prefer a fully preassembled door.
Final assessment: a solid mid-range kit that delivers good materials and a strong finished look, provided you’re ready for minor fitting and fastener upgrades.
Want to see current pricing and customer photos? View on Amazon & Read more Reviews →


